NEW RECIPE! Grilled Salmon with Grilled Lemon Vinaigrette

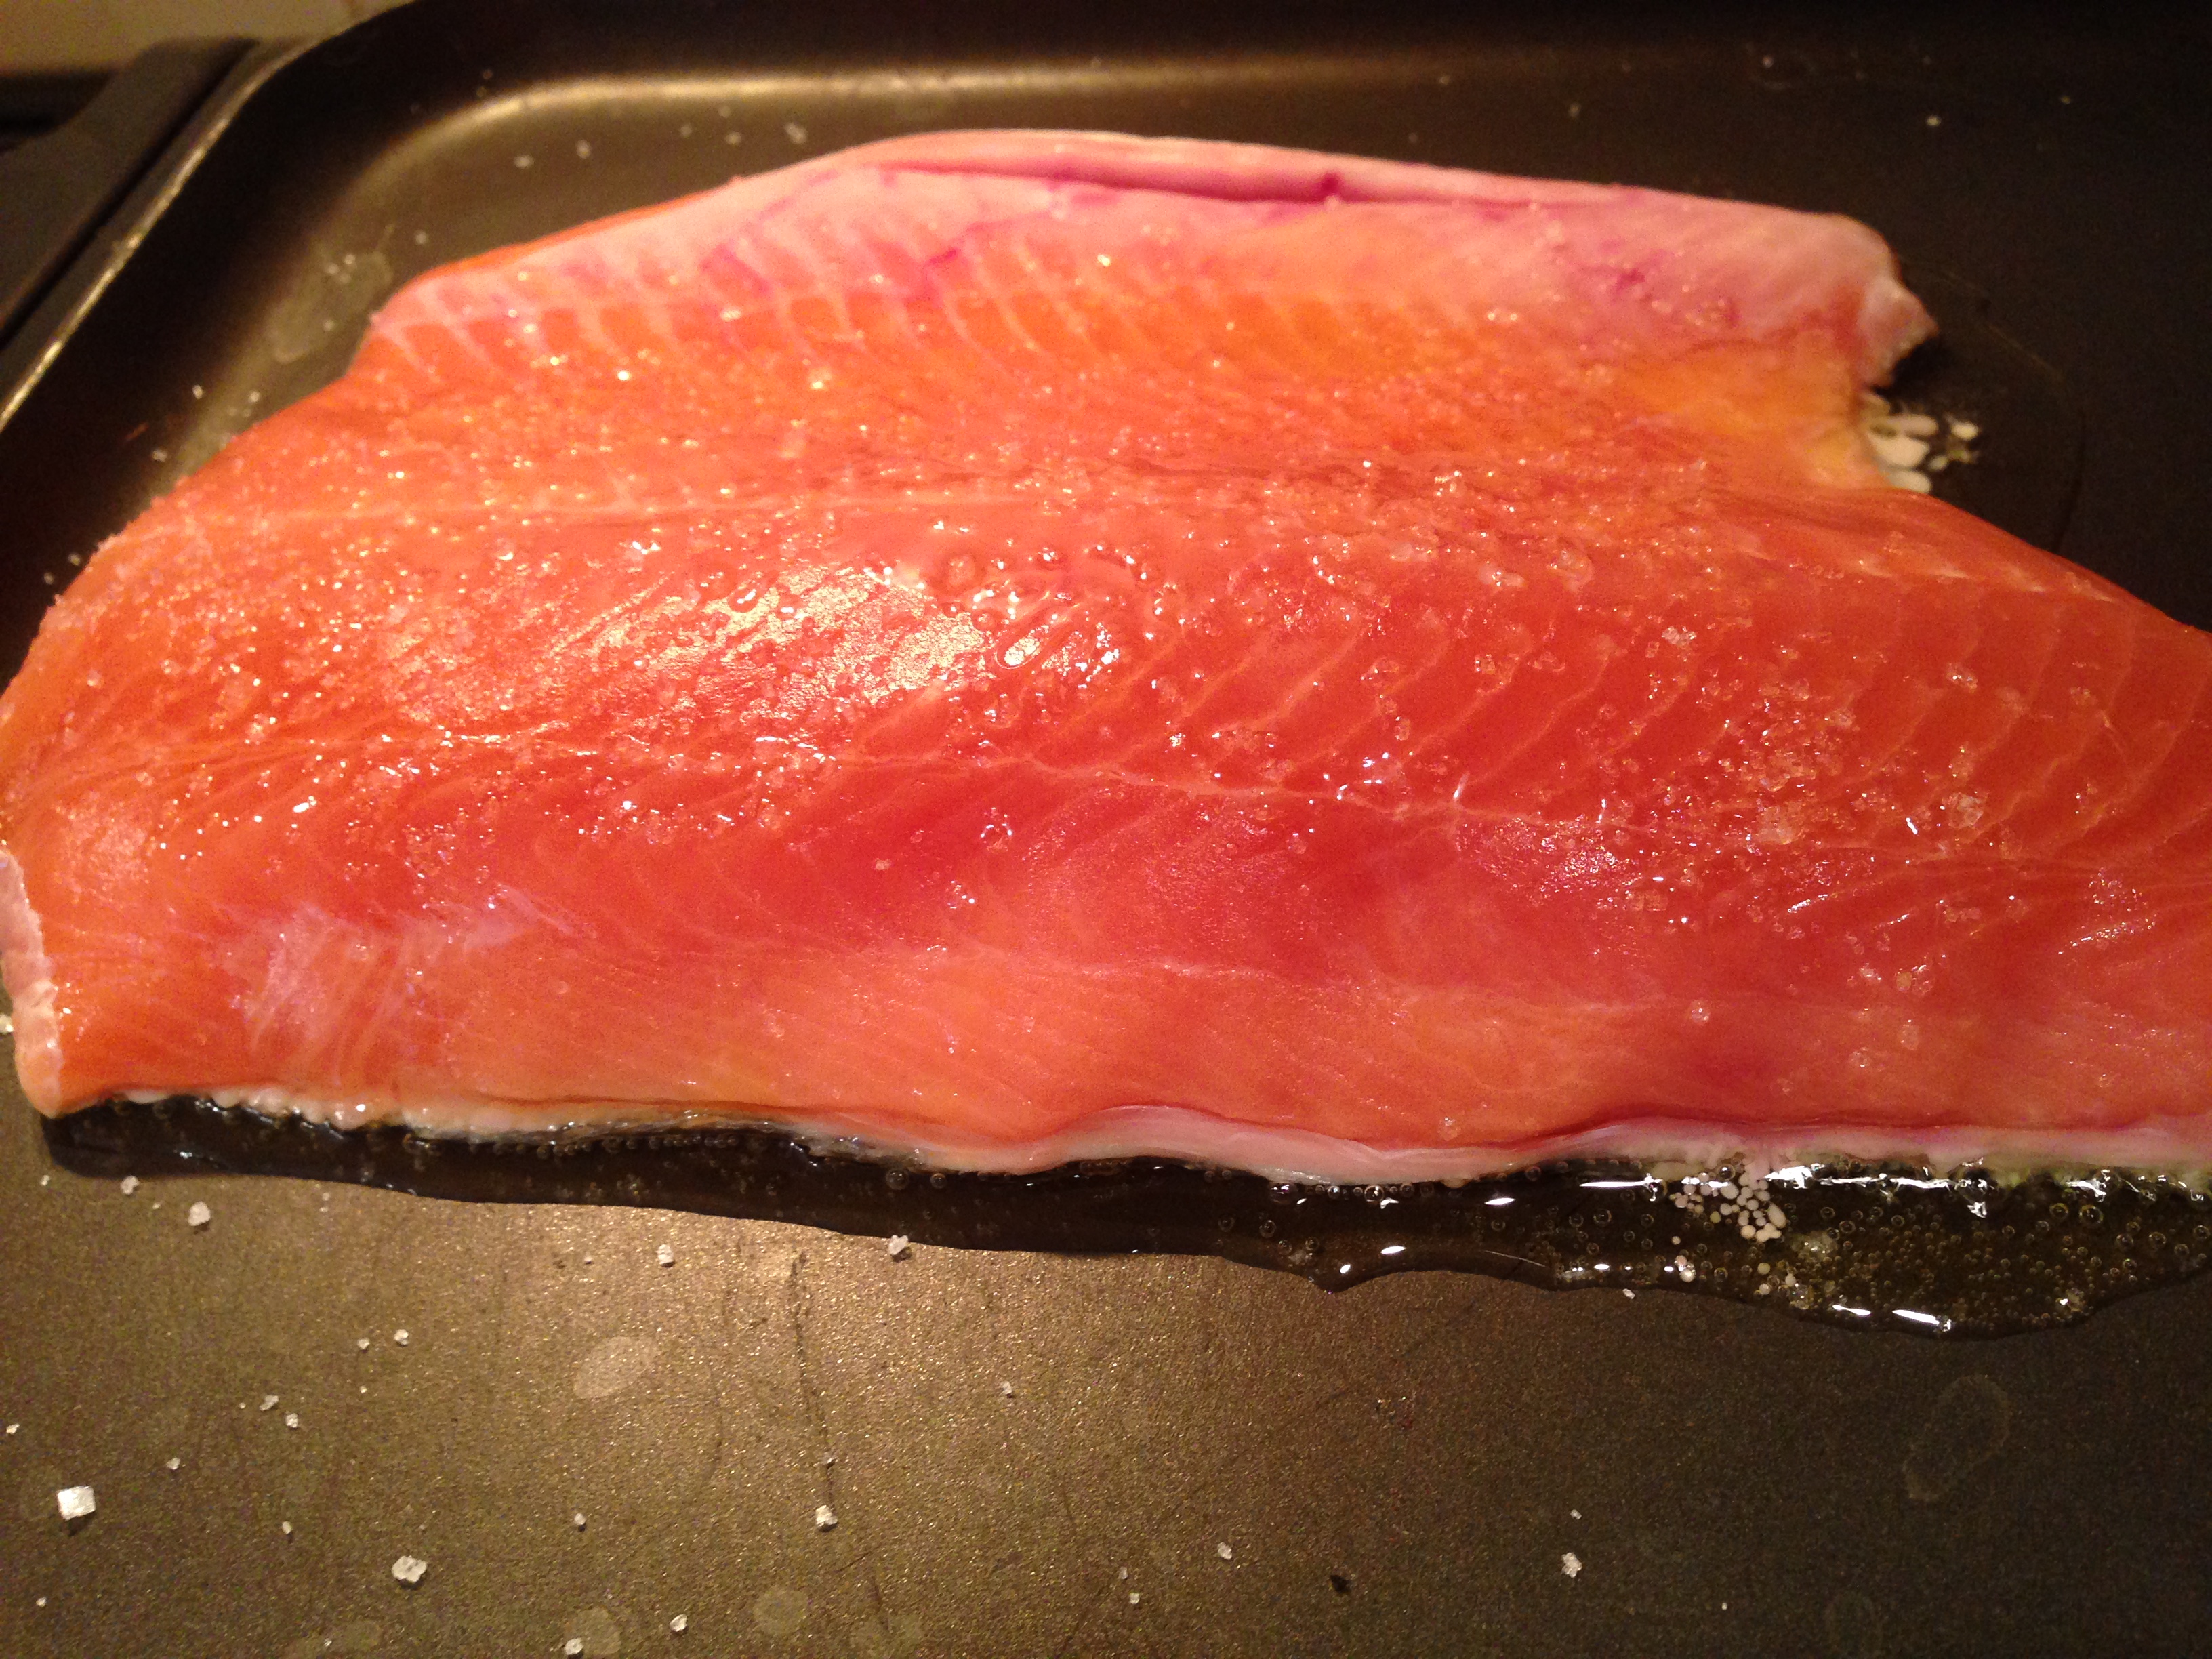
I continued making my way through the It’s All Good cookbook this evening with a grilled salmon recipe.  I bought salmon at the farmer’s market  a couple of weeks ago from a man who catches it himself from the waters off of Alaska and packages it right on his boat.  Then it’s flash frozen.  He told me that when I’m cooking it, it should smell like the ocean and not fishy.  Well, he was right.  It smelled fresh and tasted even more delicious.  It was definitely a quality piece of fish.  I served it with roasted Brussels sprouts and quartered potatoes.

salmon grilling
Love the color of fresh salmon

The recipe was so simple even a tween could make it.  I think I’ll be teaching my almost 11 year old this one.

Salmon (the wild-caught kind from the Atlantic ocean has the highest concentration of Omega 3’s) is so healthy for you.  Omega 3 fatty acids are wonderful for heart and brain health.  They also promote  healthy joints and skin, and reduce the risk of heart disease.  According to the American Heart Association, adults should have two servings of omega 3-rich foods per week.

GRILLED SALMON WITH GRILLED LEMON VINAIGRETTE (adapted from the It’s All Good cookbook)

INGREDIENTS:

  • Four 6-oz salmon fillets or one large fillet of equitable size
  • 2 T olive oil for grilling, plus 1/2 cup for the dressing
  • Sea salt
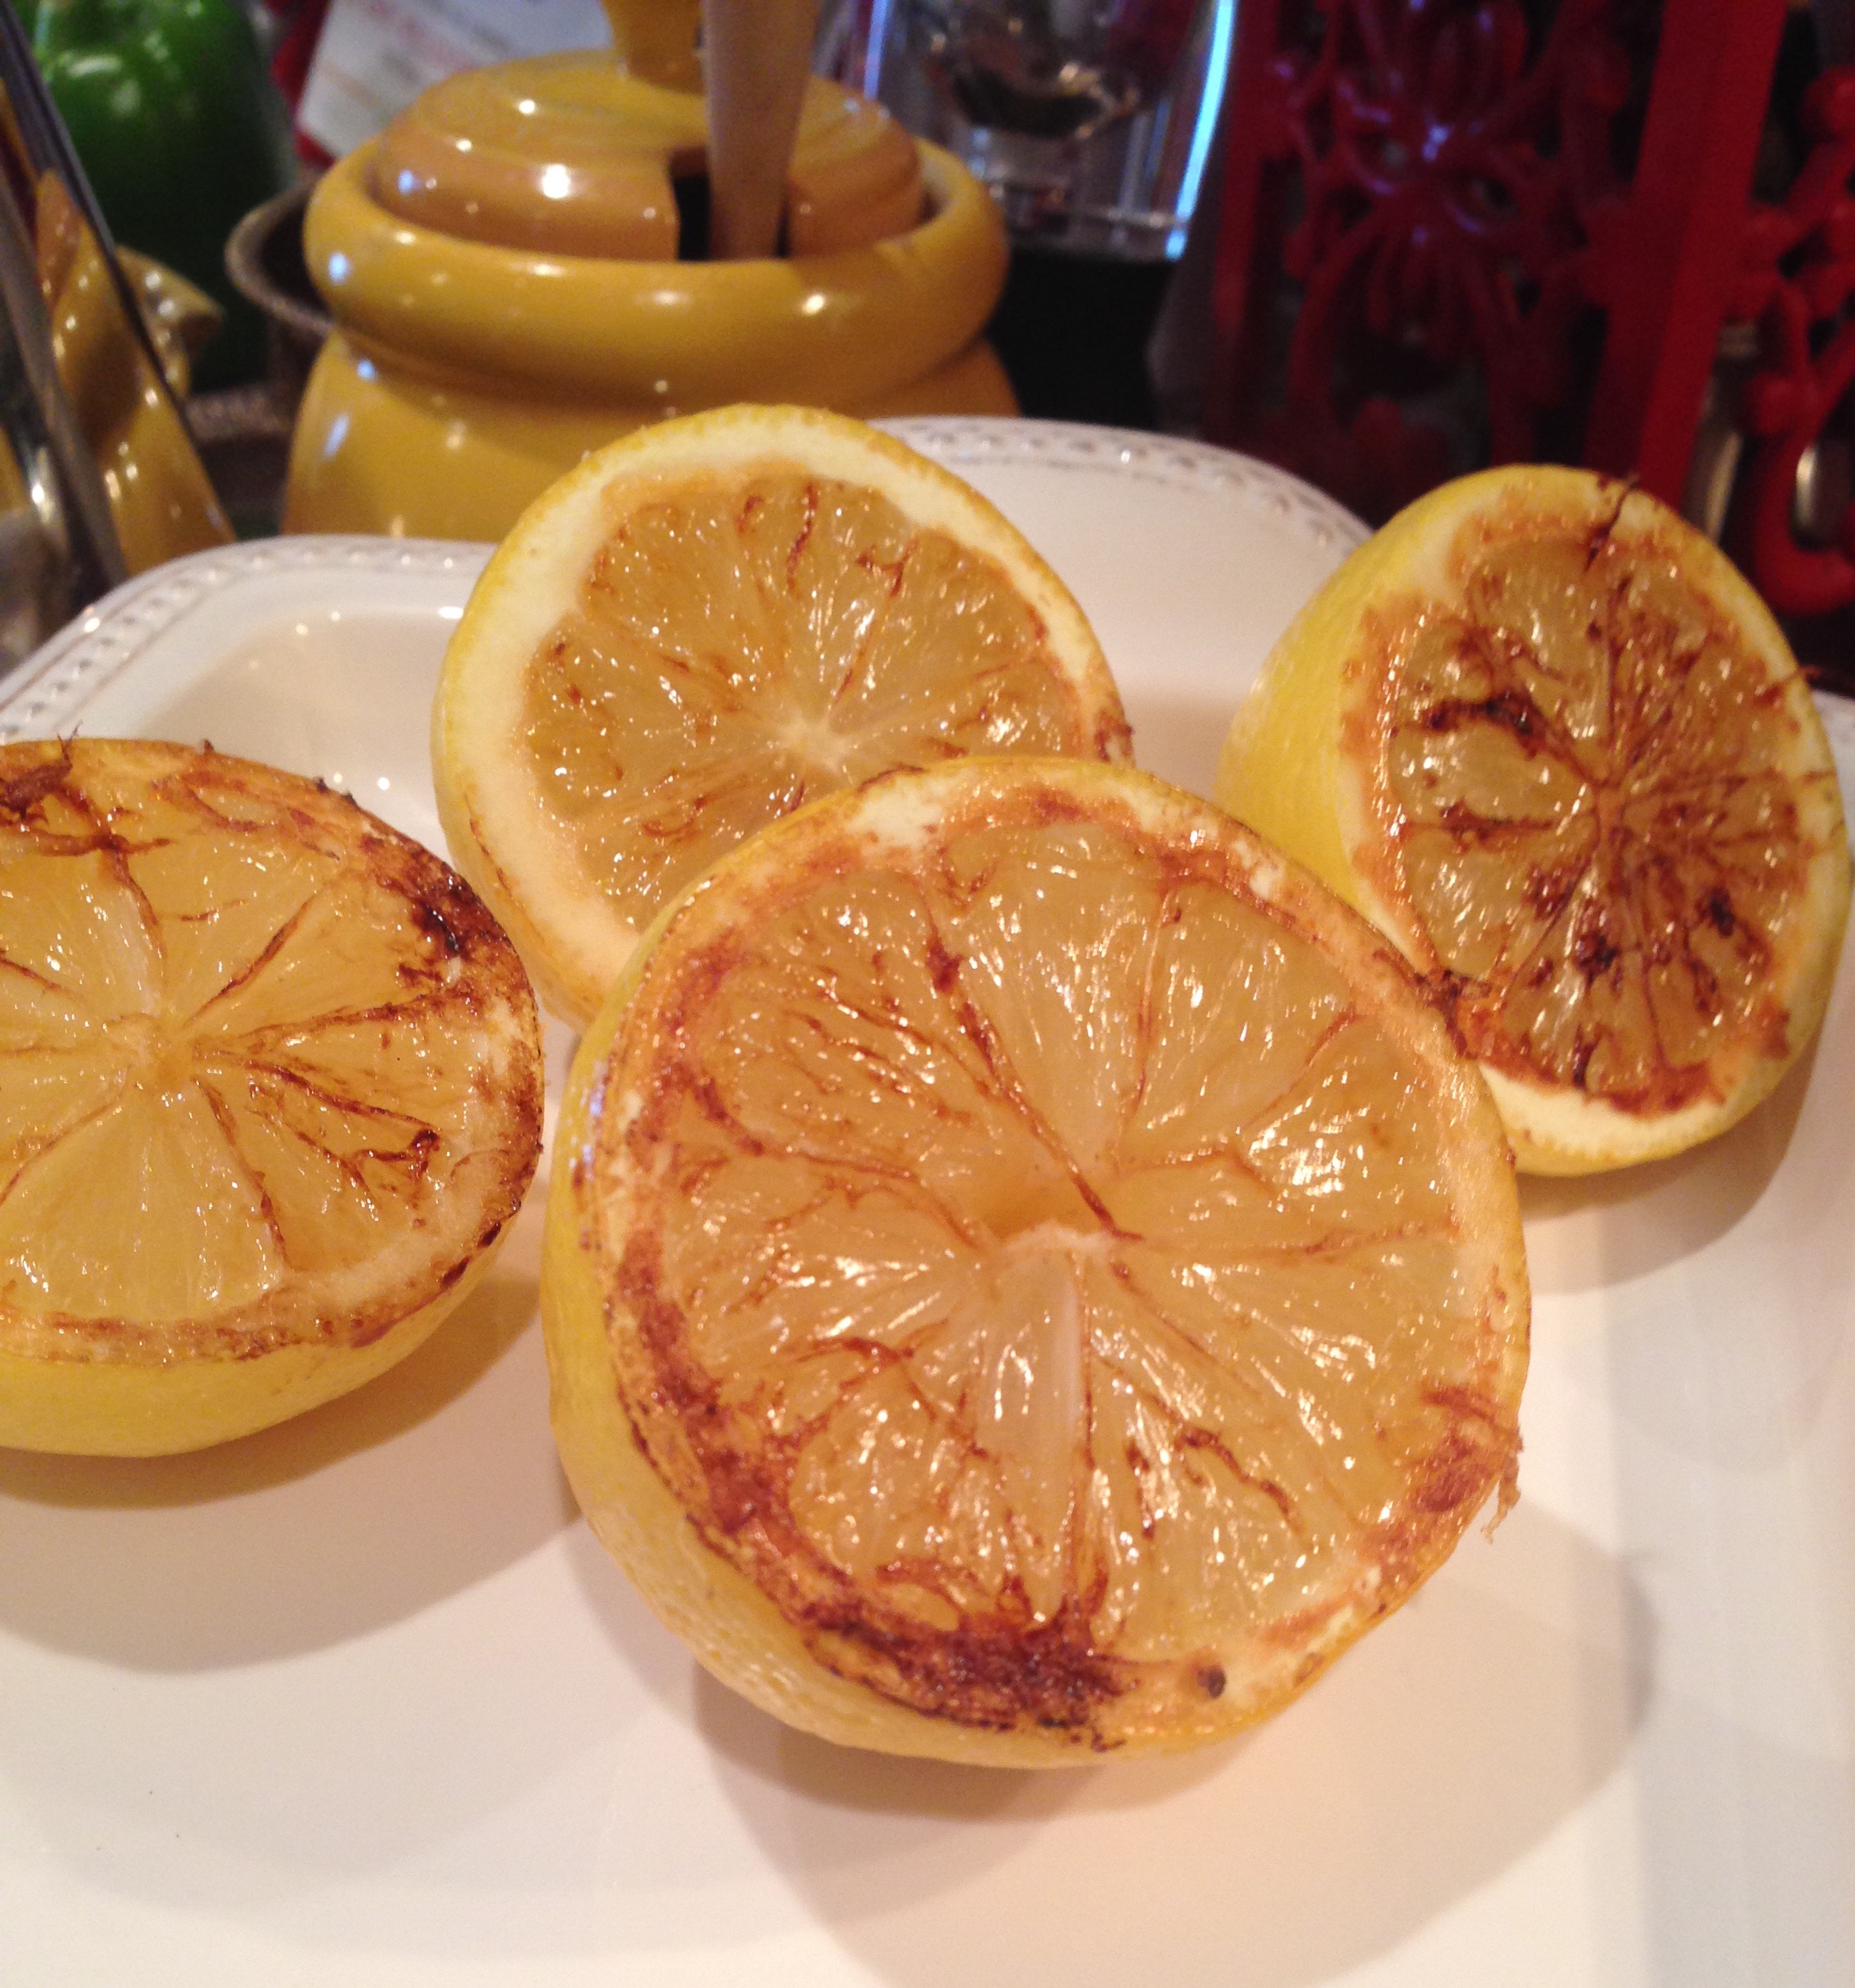
  • 2 lemons, cut in half
  • 2 tablespoons fresh chopped parsley or cilantro
  • 2 tablespoons chopped chives (I like the Lighthouse brand of dried chives in the off-season)
  • Black pepper
  • Garlic powder

METHOD:

  • Heat a grill pan over high heat.  Add the fish, skin side down and drizzle with the 2T of olive oil. Sprinkle with salt and garlic powder.
  • Cook until firm, about 4 minutes on each size.  After you flip the first time, add some fresh black pepper and more salt and garlic powder.
  • At the same time, grill the lemons, cut side down.  Watch them and remove when they are softened and the flesh has darkened.
  • When the salmon is done, transfer to a platter and let rest.
  • Squeeze the grilled lemons into a bowl that already contains the 1/2 c olive oil and chopped herbs.
  • Serve salmon with the dressing on the side
lemon grilled
I’ve never grilled lemons before but I love the sweetness they take on.
roasted veggies
It’s hard to go wrong with simple roasted potatoes and Brussels sprouts.
Salmon plated
The finished meal.

I think we will have to make the granola next — it’s back-to-school and we are needing some quick and healthy breakfast options.

Until next time!

NEW RECIPE! Easy Garlicky Mustard Vinaigrette

garlicky mustard vinaigrette

Good quality salad dressing is one of those recipes that is just so easy to make, and so darn expensive to buy at the store.  Most store-bought salad dressings have unnecessary ingredients and fillers, not to mention lower quality ingredients than what you probably have on hand in your kitchen and pantry.

This Easy Garlicky Mustard Vinaigrette is a great recipe to start with if you are new to making salad dressings or you just feel like having a simple vinaigrette.  It’s almost always in my refrigerator.

Every ingredient in this dressing is healthful, and it is full of good fats (olive oil) and possible cancer prevention (garlic, mustard seeds and vinegar).

INGREDIENTS:

½ cup olive oil

2 tablespoons rice wine vinegar (you can substitute any vinegar you like here)

1 teaspoon whole grain mustard

¼-1/2 teaspoon salt (to taste)

1 clove garlic smashed with the flat side of a chef’s knife

Black pepper to taste

METHOD:

Combine all ingredients in a jar with a lid and shake vigorously until combined.  When the dressing has the intensity of garlic taste you desire, remove the piece and discard. When you refrigerate this dressing, it will likely turn into a solid.  Simply remove from the refrigerator about 1/2 hour before using, or run under warm water. It will last about a week or so in the fridge.

NEW RECIPE! Potato, Carrot and Leek Soup

carrots
Fresh in-season carrots are so sweet and delicious.
leeks
Don’t be afraid of leeks. They are awesome.

I picked up my CSA box yesterday that contained two fresh leeks and a bunch of carrots.  Because it’s late August, my immediate thought was “I’ve got to make some soup!”.  There was a time when I was petrified of leeks.  Like, I had absolutely no idea how to use them or prepare them.  I found myself intimidated.  But I decided several years ago to just get over myself and once I went leek, I never went back.  So, I got home from the farmer’s market, found a bag of potatoes in the pantry, and got to work. It was lunchtime and we were hungry so I didn’t stop to snap photos.  Trust me, though, this is a soup you’ll want to make over and over again.  Note: When leeks are unavailable, substitute any mild sweet onion such as Vidalia.

This soup is hearty without being overly heavy.  It smells fantastic while cooking. My husband, who was outside doing yard work, kept catching whiffs of it as he walked by the back door and couldn’t resist asking for a sample before it was done. You will find yourself making this a go-to soup all fall and winter long.

INGREDIENTS:

  • 2-3 Tablespooons butter (or olive oil if you want a vegan soup)
  • 2 large leeks, washed well and chopped, white and light green parts
  • 5 celery stalks, chopped
  • 8 cups vegetable broth (I prefer using Better Than Bouillon)
  • 6 large potatoes, scrubbed and quartered (I leave mine unpeeled, and you can use essentially any kind.  Russets might get mushy if you care about that kind of thing.)
  • 8 carrots, chopped (again, I wash mine well and leave unpeeled)
  • 1 squash, any size, quartered (you can omit this, but I happen to have a lot from the CSA box to use)
  • 1-2 teaspoons salt, depending on the salt content of your broth/bouillon
  • 1 bay leaf
  • 3 cloves of garlic, diced
  • Pepper to desired taste (generally 1/4-1/2 teaspoon)
METHOD
  • Melt the butter in a large stock pot over medium-high heat.  When the pot is nice and hot, cook leeks and celery until softened, about 5 minutes.  Make sure not to burn the vegetables.
  • Add the broth, potatoes, carrots, squash,  garlic, salt (if desired) and bay leaf
  • Bring the soup to a boil and cook until potatoes and carrots are fork-soft (about 20 minutes).  Remove bay leaf.
  • Using an immersion blender, blend soup in short bursts until you have a mixture of smooth and chunky soup.  If you prefer totally creamy soup, use the blender until everything is combined.  We prefer more of a “stew” consistency.  (If you don’t have an immersion blender, a counter top blender would also work.)
  • Return the soup to the burner and simmer on low another 20 minutes or so to let the flavors come together completely.

This soup makes fantastic leftovers.  The soup with thicken the longer it sits.  If you want a thinner soup, just add some water or other liquid when you reheat.

Peanut Butter and Banana Wraps For Back To School

peanut butter banana tortilla
Peanut butter, bananas and granola wrapped in a whole grain tortilla

Now that it’s back-to-school time, I have received several requests from friends for easy after school snack ideas.  I’ll admit, sometimes we just go with a Kind bar or a Lara bar (both options have less sugar and minimally processed ingredients).  But many times it’s apples and peanut butter, guacamole and whole grain tortilla chips, a whole wheat pita with some olive oil, a piece of fruit, or some fresh veggies.  Sometimes I get creative and try new things.  The after school snack is a great time to try new ideas with your kids, because they tend to be ravenous when they come home from school and more willing to try new foods!

One of my daughter’s favorite easy but delicious snacks is a whole grain tortilla filled with banana and peanut butter.  You could also add granola in there for added “heft”, especially when using this as a breakfast or lunch idea.  These wraps travel really well, so put them in your kids’ lunch boxes, and bring them along for when you need a quick dinner between activities.  There’s great protein and healthy fats in the peanut butter.  The banana is full of potassium and fiber (you could also use apples in here).  The granola has a nice crunch, especially if it’s homemade and/or one that isn’t crammed with sugar (I really love the Purely Elizabeth brand).

Keep an eye here for more healthy snack ideas. If you have any recipes for snacks your kids like, please comment and share below!

Rosemary Infused Simple Syrup

Rosemary infused simple syrup, gin, and seltzer water. Simple and refreshing.

In my world, the one in which I try really hard to eat healthy foods most of the time, I also leave room for decadence. Right now I’m sort of obsessed with cocktails. I’m not talking Bud Light Lime-a-Ritas (although they serve a very important purpose in very specific situations, let me get back to you on that). I’m talking about well made cocktails using high quality ingredients. Last weekend I posted a recipe for the Blueberry Balsamic Liqueur I made.  Sunday night I was lucky enough to try something called a Berry Patch which included blueberries, gin, lemon juice, and rosemary-infused simple syrup.  My favorite part of the cocktail was the rosemary flavor.  I got excited because I had leftover simple syrup from the blueberry concoction and I also had rosemary in the freezer that I harvested from the garden last fall.

It’s so easy.

ROSEMARY INFUSED SIMPLE SYRUP

  1. Take about five springs per cup of simple syrup and simmer both in a small saucepan on the stove for about 5-10 minutes, watching carefully that it doesn’t boil or scald.
  2. Remove the saucepan from the heat and let sit for at least 30 minutes.
  3. Strain out the rosemary sprigs and pour the syrup into a clean jar.  It should last about a month or so in the fridge.

Wondering how to make simple syrup in the first place?

  1. Take equal parts of sugar and water and combine in a medium saucepan.
  2. Stir the mixture over medium heat until the sugar dissolves.
  3. Increase the heat and bring to a boil. Reduce heat to medium and simmer 3 minutes.
  4. Pour syrup into a container to cool.  Store in a jar in the refrigerator.

Cheers!

Japanese Meatballs — Review and Recipe

meatballs and sauce

As you might already know, I’ve committed to cooking my way through Gwyneth Paltrow’s newest cookbook It’s All Good: Delicious, Easy Recipes That Will Make You Look Good and Feel Great. This, by the way, is a huge statement.  These recipes will make me LOOK GOOD?  AND FEEL GREAT!? I feel like I should take before and after photos or something.

We last made Vegetable Potstickers that were a huge hit.  We ate those up very quickly.  To summarize the experience: they weren’t super difficult to make (although they weren’t easy either) but were very messy.  I was looking forward to making the Japanese Meatballs because they looked much easier and less messy to make.  Plus we like meatballs.

With some help from my blog readers, I decided that I am allowed to make substitutions to recipes as I see fit.  My good friend Becky pointed out that I was actually doing my readers a service by suggesting substitutions and tweaks that other busy people might also appreciate.  Take, for instance, the Chinese Five Spice Powder called for in the dipping sauce.  I really dislike the taste of this particular spice blend.  My sister in law told me that she hadn’t ever heard of it and could I please recommend something different.  I’m thinking that a lot of other people probably don’t have it on hand.  So, I made the Hoisin Sauce without the spice powder thinking that I could taste it and add something back if I thought it needed it.  Turns out the Hoisin Sauce tasted phenomenal without it.  So, there you go. Another substitution came in the form of using turkey rather than chicken, because the grocer was out of ground chicken.

Here’s the recipe, adapted:

MEATBALLS

1 lb ground turkey or chicken (or beef or lamb or any combo you prefer)

1/2 teaspoon salt (I like sea salt)

1/2 teaspoon pepper (Gwyn would say freshly ground, I say use whatever)

1 garlic clove or more if you love garlic, finely minced

1/2 teaspoon ginger powder or 1 teaspoon fresh grated ginger

1 tablespoon soy sauce (low sodium if possible)

2 teaspoons real maple syrup

meatball spices
Look at these beautiful spices and ingredients.

METHOD:

Mix all ingredients in a bowl with your hands and form into small balls.  Bake at 400 degrees for about 20 minutes but keep an eye on them.

Hoisin Sauce (recipe below)

1 tablespoon canola oil

1 garlic clove, minced

1/4 cup miso paste

1/4 cup real maple syrup

2 tablespoons rice vinegar

METHOD:

Heat oil in small saucepan over medium heat, add garlic and cook about 30 seconds.  Add the rest of the ingredients and whisk to combine.  Bring to a simmer and cook, whisking constantly for a couple of minutes.  Let cool and serve.

A couple of notes about the meatballs: there are no bread crumbs in there.  Gwyneth is gluten-free (of course she is.  I mean, obviously) So when you are shaping them they have a very soft, sticky, almost doughy consistency.  See?

uncooked meatballs
Uncooked meatballs

Not to worry, they bake up very nicely.  The recipe states you can bake, pan fry, grill or however-you-want these meatballs but gave no directions for any cooking, so I looked it up and decided I’d bake mine at 400 degrees for about 20 minutes.  Check every few minutes to make sure they aren’t being overcooked. 

The result was that my family really enjoyed them, the sauce was my favorite part (visually, it isn’t beautiful — My daughter and I thought it looked like apple sauce, and my husband assumed it was a peanut sauce). I would definitely make these again and double or triple the recipe for freezing.

Stay tuned for the next recipe!

Quinoa and Veggie Salad

Quinoa salad

Ok, so last night we were lucky enough to be invited to a private event at the Children’s Theater Company in Minneapolis which included the coolest theater experience we’ve ever had (a fully immersive and interactive performance of 20,000 Leagues Under the Sea) followed by a traditional lobster boil by Smack Shack.  It was amazing.

I woke up this morning feeling like I wanted to eat a bit lighter, and I had some leftover cooked quinoa and tofu from the Veggie Dumplings we made yesterday so I decided I’d make a salad for my family to have for lunch today.  I wanted something light and easy.  I had some fresh green onions and cucumbers from the farmer’s market in the fridge and peas in the freezer.  I always have garlic powder, salt and pepper, so those were no-brainers.  Below is the recipe I created, which is totally vegan.  It’s easy to sub out the tofu for another protein of your choice: beans, feta cheese, even shredded chicken.  

Quinoa super up close

QUINOA AND VEGGIE SALAD

Ingredients (makes 4 servings)

  • 3 cups cooked quinoa (I like adding a bit of vegetable Better Than Bouillon to mine when cooking)
  • 1/2 cup crumbled firm tofu
  • 2 green onions, white and light green parts only, chopped
  • 1/2 cup chopped cucumber
  • 1/2 teaspoon garlic powder or fresh garlic, minced
  • 1 cup peas
  • 1/2 cup parsley
  • course sea salt and pepper to taste

METHOD:

  • Mix everything together (think you can manage?)

This would be an easy salad to double the recipe and keep it around for lunches and side dishes all week.

EAT WELL!

Vegetable Dumplings — The Good, The Bad and The Ugly

veggie dumplings

Remember those beauties?  Vegan Dumplings were the big winners in the poll for the first recipe I would test from Gwyneth Paltrow’s It’s All Good cookbook.  You’ll remember from a previous post that I received the book as a birthday gift, and that Gwyneth and I have a long, complicated history.  Mostly it’s me not being sure if I should love her or loathe her.  It’s so hard to decide.  Regardless, I love the look of many of the recipes in her cookbook and so I decided I would cook my way through it and report back. What I want to find out are:  Are her recipes approachable?  Can a middle aged busy mom without a nanny, a cook, a housecleaner and other household help actually find the time to make the creations within?  The only way to find out is to try.

I accumulated the ingredients for the dumplings pretty easily (you know what, I like to say potstickers better, and I think the way I made them are more like potstickers, so let’s go with that from now on).  It wasn’t a crazy list with lots of expensive, hard-to-find ingredients. 

My kiddo has been in camp all week and I really wanted her help with this one, so I waited until today to make these.  You’ll notice in the photos she’s wearing her Angry Birds pajamas.  In this house, we cook in our pajamas.

The end result is that they turned out amazing.  They were really delicious and perfect and we couldn’t stop eating them.  They might not be as beautiful as the stock photo I used above.  I’m thinking I should invest in a food styling course.

finished potstickers

The downside is that they are really messy to make, including a lot of splattering if you choose to pan fry them (which we did, because PAN FRYING IS AWESOME). The cleanup wasn’t fun, but then again it never is.  My best piece of advice is to always try to clean up as you go so it isn’t so overwhelming at the end.  Here is my kitchen at the end of everything.  SO. MUCH. MESS.

dirty kitchen

So here’s the recipe, adapted from Gwyneth Paltrow’s Vegan Veggie Dumplings (I can’t legally reprint the whole recipe here without her permission, and even though I emailed last week to ask for it, I’m guessing her people have better things to do, which may or may not include sourcing local and organic tomatillos for her kids’ lunches.)

Vegan Potstickers Ingredients:

  • 1 1/2 cups green cabbage, roughly chopped
  • 1/2 small red or yellow onion, or even two or three green onions, roughly chopped
  • 1/2 cup crumbled firm tofu (I haven’t tested this but I bet you could use ground chicken, turkey or other animal protein in place of the tofu.  You know it wouldn’t be vegan anymore, though, right?)
  • 1 garlic clove, crushed
  • 1/2 cup frozen peas
  • 1/2 cup cooked quinoa (I love adding a bit of vegetable Better Than Bouillon to my quinoa when it’s cooking.  It adds flavor)
  • 1 tablespoon reduced sodium soy sauce
  • 1/2 teaspoon toasted sesame oil
  • 2 tablespoons neutral oil (I used olive oil which technically isn’t a neutral oil but it worked out fine.  You could also use canola)
  • Pinch of coarse sea salt
  • 48 square wonton wrappers found in the refrigerated section, typically near the tofu
  • Dipping sauce for serving (see below for recipe)

Vegan Potstickers Directions:

  • Pulse the cabbage, onion and garlic in the bowl of a food processor until finely chopped.

potsticker filling in food processor

  • In a large non-stick skillet heat the oil over medium-high heat and add the cabbage mixture with a hefty pinch of sea salt.
  • Cook and stir occasionally until the veggies have softened, about 5 to 6 minutes.

potsticker filling on stove

  • Add in the tofu, peas and quinoa and continue cooking until the peas are soft, about 2 to 3 minutes. Remove from the heat and add the soy sauce and sesame oil. Use a potato masher to smush up the mixture until it sticks together.  We allowed some of the peas to stay whole because we wanted a bit more texture.

mashing poststicker filling

  • Allow the mixture to cool to room temperature.
  • Make an assembly line of several wonton wrappers and put 1 teaspoon of the filling mixture in the center of each wrapper. Wet your finger in a small bowl of water and use it to moisten the edges of each dumpling. Carefully fold the corners over making a triangle, making sure you press all the edges to form a good seal.

filling potstickers

  • Heat a bit of the neutral oil (like canola) in a large nonstick skillet set at high heat. Cook the dumplings for 2 minutes, or until they are golden brown on the bottom.

potstickers in pan

  • When the potstickers are browned to your liking on the bottom, add 1/2 cup of water to the skillet, putting the lid on and allowing the dumplings to steam until the wrappers are completely soft, about 2 minutes. Serve with the dipping sauce recipe below. ***Make sure if you are using a skillet that isn’t non-stick that you pay close attention to the potstickers because they will cook a lot more quickly than in a non-stick skillet. (See the photo below for what happens when you don’t pay close enough attention.)

burnt potstickers

  • Vegan Potsticker Dipping Sauce Ingredients:
  • 3 tablespoons soy sauce (I use lower sodium)
  • 1 teaspoon rice vinegar
  • 1 teaspoon toasted sesame oil

Combine all ingredients with a fork or a whisk and serve alongside the potstickers.

EAT WELL!

Weekend Cocktails –Blueberry Balsamic Liqueur 

blueberry_smash_646

Last year for my birthday my good friend Angie gave me a cocktail “cookbook” called Homemade Liqueurs and Infused Spirits. She knows me so well. I love a good cocktail. You know, antioxidants and resveratrol and all.  I had a lot of free time today with my 10 year old being in camp and so I decided to try my hand at the Blueberry Balsamic Liqueur.  What I love about making my own is that I know exactly what’s going in there.  Did you know that liquors aren’t required to have labels with their ingredients or any nutritional information?  They can put whatever they want in there and you wouldn’t know.  So, sometimes it’s nice to make your own.  I have more blueberries than I can handle right now (see my previous post about my kiddo going on a produce strike) so the Blueberry Liqueur seemed like a great choice.  The following recipe is inspired from the original in the book.  You take the blueberries, muddle them with the simple syrup, and then add in the vodka, wine and balsamic.  Put the lid on it, store it in a cool dark cabinet for a week, and when you take it back out, strain the mixture with a mesh strainer into a clean container. Seal it up, store in a cool dark cabinet, and use within 1 year (if it lasts that long).
Ingredients:

  • 2 pints fresh blueberries OR 1.5 lbs. frozen blueberries, thawed
  •  2 cups simple syrup (2 cups sugar stirred together with 2 cups water in a sauce pan over medium high heat, brought to a boil and then let to cool)
  • 2 1/4 cups vodka (I absolutely love Prairie Organic Vodka made right here in Minnesota)
  • 1 cup fruity red wine like Merlot or Cabernet
  • 1/4 cup balsamic vinegar

CHEERS!

It’s All Good?

Gwyneth_Paltrow_avp_Iron_Man_3_Paris_2I recently decided that I’m going to cook my way through the It’s All Good cookbook by Gwyneth Paltrow. I have a love/hate relationship with that woman, and mostly it’s not love because my perception of her is that she gives off an aura of smugness. However, the recipes in her cookbook look really good, healthy, and in keeping with my culinary goals. She’s kind of anti-gluten (I’m not) and anti-dairy (I have trouble with milk but looooove cheese), but for the most part I think her recipes look yummy. As a busy mom with no household help, I’m interested to find out how approachable the recipes are. Of course, I will blog about my experience, providing you with photos and links to recipes.

I need your help choosing the first recipe I make! It’s from the section on kid-friendly foods. Should it be:

I’ll make the choice with the most votes!  Feel like cooking along with me?  You can find It’s All Good at any bookseller.  I’ll post what I’m going to make and we can share our experiences together!