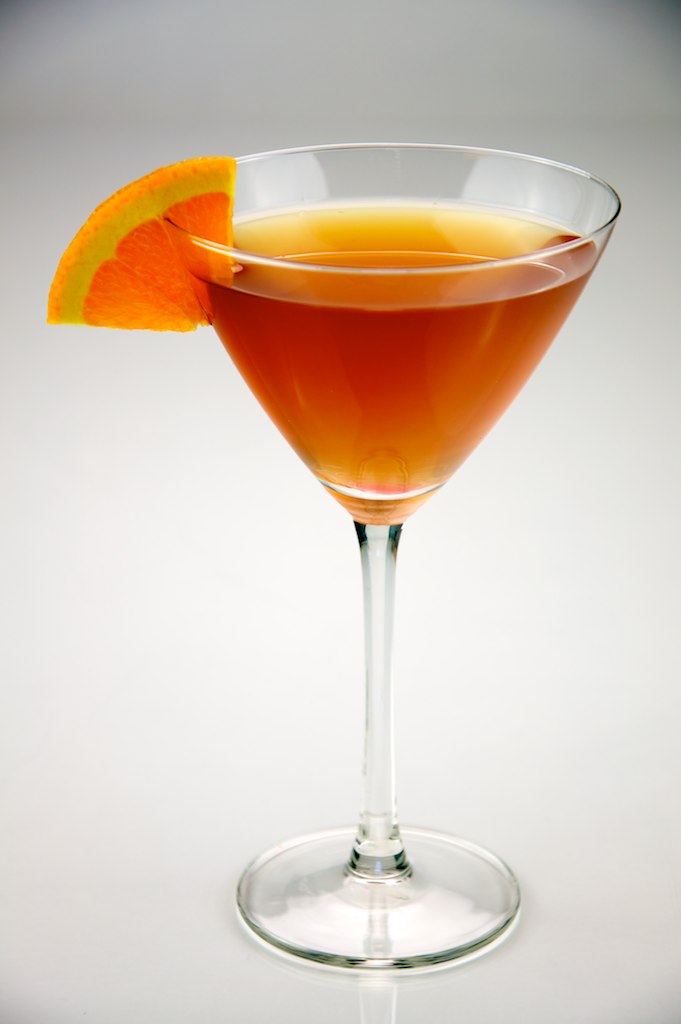
The Sidecar. It’s one of my go-to cold weather drinks. It’s what I order when I want something sweet rather than savory (like another one of my favorites — the dirty martini). There are different variations of this cocktail. Some use cognac, others brandy. Sometimes it’s made with triple sec and sometimes cointreau. Where I usually order it, they use brandy and triple sec.
The Ritz Hotel in Paris claims they created the drink in the early 1900’s, but a couple of British gentlemen have also claimed to be the inventor. Regardless, it is named after the attachment on a motorcycle. The drink has morphed and changed a lot since then, going through numerous variations.
Fancy people in England and France drank this cocktail over 100 years ago, which makes me feel very cool when I order it even though the bartender probably laughs about me behind my back.
I really like my cocktails served up so that I can sip and savor them without worrying about ice watering down the flavor. So I love that this is served in a martini glass.
If you want to try this at home, it’s pretty simple!
INGREDIENTS:
Freshly squeezed lemon juice and sugar if you want to frost the rim
1 cup Cognac or good brandy
1/2 cup Triple Sec or Cointreau
1/4 cup freshly squeezed lemon juice
Maraschino cherries (I like Tillen Farms all natural) or lemon peel, to garnish
METHOD:
If you want to frost the glasses, swipe the lemon wedge around four martini glasses and then dip in a shallow plate of sugar.
Combine the Cognac, Triple Sec, and lemon juice in a cocktail shaker with ice. Shake well and pour into the martini glasses. Garnish with a cherry or lemon peel (or both, if you feel like living on the edge).
It’s chilly and rainy here. The leaves have covered the sidewalks and I had to wear gloves and a hat to take the dog for her walk. It is fully fall here, there’s no denying that. There is even talk of some snow fall tonight.
I had plans to go golfing today but with the arrival of rain it became a different kind of day. My daughter is turning 11 on Halloween, so I decided to cozy up and make her some muffins. She loves pumpkin muffins so I set out to make a healthy version that she could have for breakfast this week.
I found a recipe that looked great on Food.com and knew that with a few tweaks of my own I could reduce the sugar and add some whole grains without compromising the taste or texture. The original recipe also called for nuts, but since my kiddo lives for chocolate and doesn’t love nuts in her baked goods, I subbed semi-sweet chocolate chips for the nuts. If you love both I think you could absolutely add nuts and chocolate (which would be my vote but since it’s her birthday and her muffins, I did what all mothers do from time to time and sacrificed. It was a big one but I’ll recover).
I wanted to check in with a quick nutritional tidbit for this week. As you have probably read and heard thousands of times by now, artificial sweeteners aren’t good for us. We know this because the nutritional and wellness experts have said so. But do you really understand the *why* behind it?
There are a few key reasons, and I will quickly outline them for you here.
All non-caloric sweeteners, even Stevia, require commercial processing. Some use less toxic chemicals and some use organic processes. But, they all go through processing. If your goal is to eat as close to “natural” as possible, then a highly processed artificial sweetener probably doesn’t fit into your plan.
All that processing and artificial ingredients tax your body’s detoxification system. Our bodies are made to handle toxins, and our livers and kidneys are hard at work every day to get rid of substances we can’t use. When we burden our detox systems with unnecessary substances, it means that they have to work even harder. (Some studies have found a correlation with artificial sweeteners to kidney disease. Correlation does not equal causation, and more research needs to be done. Still, with my family’s kidney disease genes, it’s a good enough reason for me to keep my artificial sweeteners to a minimum. For more on this topic, click here and here.)
Somehow, even with the prevalence of zero-calorie artificial sweetener consumption, the U.S.population has continued to gain weight and fall prey to Type 2 Diabetes. While researchers try to figure out the reasons why, some have started to wonder if consuming too much artificial sweeteners tampers with our gut microflora, which in turn makes us more susceptible to maladies like glucose intolerance (a precursor to diabetes). Studies have both proven and disproven this theory, so obviously a lot more research needs to be done. Read more about it here.
FULL DISCLOSURE: I am a proponent on “moderation”. I am not perfect, nor do I try to be. I enjoy a Diet Coke from time to time because it makes me happy. Just the way I will eat a few gummy bears (or whatever) if I feel like it. If I am following the 80/20 rule of nutrition, then I let the rest go. Life, in my opinion, is to be enjoyed. If eating a completely organic, whole foods diet is what makes you happy, then go for it! But for me, I find having a little wiggle room works best.
*Check with your trusted physician or practitioner before you make any major dietary changes, especially if you are being treated for illness or disease.*
As always, I would love to hear what you have to say!
I put together a new fall pasta recipe tonight (with inspiration from a Cooking Light recipe from 2001.) My fabulous friend Sally dropped off some fresh herbs from her garden yesterday and I was so glad to be able to use some of her sage in here.
I love butternut squash, especially in the fall. And anything in the onion family automatically is one of my favorites.
This recipe comes together quickly. While you roast the vegetables, get the water boiling for the pasta. 20 minutes later dinner will be on the table. Serve with crusty bread and a salad.
This is the kind of recipe where you can use whatever veggies you have around. Herbs, too. My family rated it a “solid 8 out of 10”. I hope you all like the recipe for an easy and filling dish (bonus: it’s vegetarian).
LINGUINE WITH ROASTED BUTTERNUT SQUASH, SHALLOTS AND LEEKS
INGREDIENTS
3 cups (1-inch) cubed peeled butternut squash
1 tablespoon pure maple syrup
2 tablespoons olive oil, divided
3/4 teaspoon salt
1/2 teaspoon freshly ground black pepper
4 shallots, peeled and halved lengthwise
1 cup leeks, white parts only, chopped
1 cup frozen peas
1 tablespoon chopped fresh sage
12 oz fettuccine (I love Sunrise pasta, click here to shop online)
1/2 cup (2 ounces) grated fresh Parmesan cheese
Preparation
METHOD
1. Preheat oven to 475°.
2. Combine squash, leeks, shallots, maple syrup, 1 tablespoon oil, salt, pepper, jelly roll pan; toss well.
3. Bake at 475° for 20 minutes or until tender, stirring occasionally. Stir in sage.
4. Meanwhile, cook pasta according to package directions. Add frozen peas to boiling pasta at the beginning. Drain.
5. Place cooked pasta and peas in a bowl. Add remaining 1 tablespoon oil; toss well. Serve squash mixture over pasta. Add salt and pepper to taste.
6. Place the cheese on the table and allow people to sprinkle their desired amount on top of the pasta (if you omit the cheese, the dish is vegan).
It’s Friday! That means it’s time to try a new drinks recipe. The weather is cooling off for many parts of the world. Here, the leaves are changing into beautiful colors and the days are cool and the nights cooler.
My neighborhood this week.
When the weather shifts in the fall, I start ordering drinks with a bit more substance. The vodka tonics and rosé wines from summer don’t feel satisfying anymore.
In the last couple of years I’ve really started enjoying hard cider. And while I’m not a fan of typical sangria, I think this hard cider sangria recipe looks fantastic. While it calls for red, yellow and green apples, I wouldn’t worry too much about using all three unless you are having company and really want to impress. Put whatever you have in there, which for us is usually a fuji. Don’t have a navel orange? Use a couple clementines instead.
We are having people over for chili and treats on Halloween (click the link for a recent chili recipe I posted). This will be the perfect drink to serve.
INGREDIENTS
1 cup quartered and thinly sliced unpeeled green, yellow and red apples (or whatever color you have on hand)
1 navel orange—quartered and thinly sliced crosswise (you can also use clementines)
One 22-ounce bottle hard apple cider, chilled (Angry Orchard is my current favorite)
Ice
INSTRUCTIONS
In a pitcher, combine the apples with the orange, apple juice, lemon juice and brandy. Just before serving, add the hard cider. Serve in tall glasses over ice.
It’s been a busy day so far! I just finished my next module for my Nutrition Consultant program which focused on digestion and the digestive organs. I created two handouts focusing on liver health (eat your fiber, fruits and veggies, and be careful of the medications you take!). I ate a quick lunch of leftovers from the recipe I’m about to give you, as well as a Dr. Praegers Kale Veggie Burger. I’d say my morning has been pretty productive. Just don’t pay attention to my poor yellow lab Sammy, who has been literally giving me puppy dog eyes as she sits at the door waiting for a walk. I’ll get to it, I promise.
How can you say ‘no” to this girl when she wants a walk?
On to the white beans! I chose this recipe because it had simple ingredients that I love (garlic, beans, shallots, red wine, thyme) and I figured not only could I serve it to my family as a dinner side dish, but I could also have it for lunch. Usually my dinner side dishes consist of roasted veggies, brown rice, stuff like that. I prefer to use my energy on the main dish (i.e.: I’m lazy). But this recipe looked so easy I decided to try it. As much as I want to despise Gwyneth Paltrow, with her smugness and natural makeup-free beauty and her ability to wear the most ridiculous hats and still look cool, I just can’t hate her recipes. Not yet, anyway. The beans were yummy and filling. Full of protein and fiber. And I decided I should use shallots a lot more. I love the way they take the place of onion while being a little more subtle. NOTE: I doubled the recipe to have leftovers.
WHITE BEANS, FRENCH STYLE
INGREDIENTS:
2 Tablespoons extra virgin olive oil
2 garlic cloves, thinly sliced (add more if you love garlic)
Leaves from 4 sprigs of thyme (I used about 1 tsp dried instead)
1 large shallot, peeled and thinly sliced
A 14 oz. can of cannellini beans, drained and rinsed
Coarse sea salt
Freshly ground black pepper
2 tsp. red wine vinegar
METHOD
Slice the garlic and shallots thinly.
Sliced shallots and garlic. Don’t dice them. You want the shallots to remain intact a bit.
Meanwhile, heat the oil in a large pan or skillet over medium heat. Add garlic and let cook for a few minutes or until a light golden brown. Stir occasionally. Add the thyme and shallot, and cook for a minute or two.
The smell of shallots or onions and garlic sautéing is one of the best smells I can imagine!
Add the beans and cook, stirring once or twice, for about 5 minutes. Add the salt and pepper to taste, along with the vinegar, and cook for another 5 minutes.
It’s such a pretty photo I put it in twice!
If you reheat the beans, expect them to dry out a bit. You can add some chicken stock or water to rehydrate. My husband was a huge fan of these and gave me an actual thumbs up. The kiddo, who will try anything once but has some texture aversions, didn’t finish hers.
I continued to test the recipes from Gwyneth Paltrow’s cookbook It’s All Good this week, landing on the Chicken & White Bean Chili recipe because it seemed simple, approachable, and really tasty. I make a lot of soups and chilis once the weather starts to cool down. I usually double the recipe and put some in the freezer (lay flat in a freezer baggie) for a night when I’m too busy or lazy to cook.
Whenever I make a soup or chili recipe, I tend to double the vegetables called for. It’s such an easy way to get more vitamins, antioxidants and fiber into yours and your family’s tummies.
The alterations I made to this recipe were:
Add a can of kidney beans to the can of white beans called for.
Use chicken thighs instead of breasts (I find them less dry and more flavorful).
Use a teaspoon of Better Than Bouillon (the vegetable flavor). The recipe calls for the normal chili spices plus salt and pepper. I found when I tasted the chili it was a bit bland. Better Than Bouillon is a favorite of mine. I usually by the organic version and love that I don’t have to keep cans of chicken stock around in my pantry. It stays good forever and, unlike a half-used container of chicken stock, won’t make you feel guilty every time you see it in the fridge.
Add some of the chicken juice from cooking into the pot with the simmering beans and vegetables. It adds nutrients from the chicken, some depth to the mouth feel (I really hate that term, can we come up with something else collectively? Comment below with any suggestions!) and adds some yummy chicken flavor.
INGREDIENTS:
1.5 lbs of whatever chicken parts you want (I used thighs, and doubled the amount so I would have leftover roasted chicken to use later in the week)
3 Tablespoons olive oil
Salt (I prefer sea salt but any will do)
Black pepper
2 small yellow onions, diced (about 2 cups)
1 red bell pepper, seeds and stem discarded, diced (about 1 cup)
3 garlic cloves, minced (add more if you love garlic)
3/4 teaspoon ground cumin
1/2 teaspoon chili powder
1/2 teaspoon paprika (the recipe calls for smoked paprika, but either variety is fine)
1 28 oz can of whole peeled tomatoes with their juice
1 14 oz can cannellini or navy beans, rinsed and drained (I added a second can of kidney beans)
Whatever toppings sound good to you (sour cream, cheese, cilantro, diced onion, etc)
METHOD:
Rub chicken with about 1 Tablespoon of olive oil, and season with salt and pepper. Roast for about 25 minutes at 425 degrees, until just cooked through.
When meat is cooked and cooled a bit, shred the meet with two forks
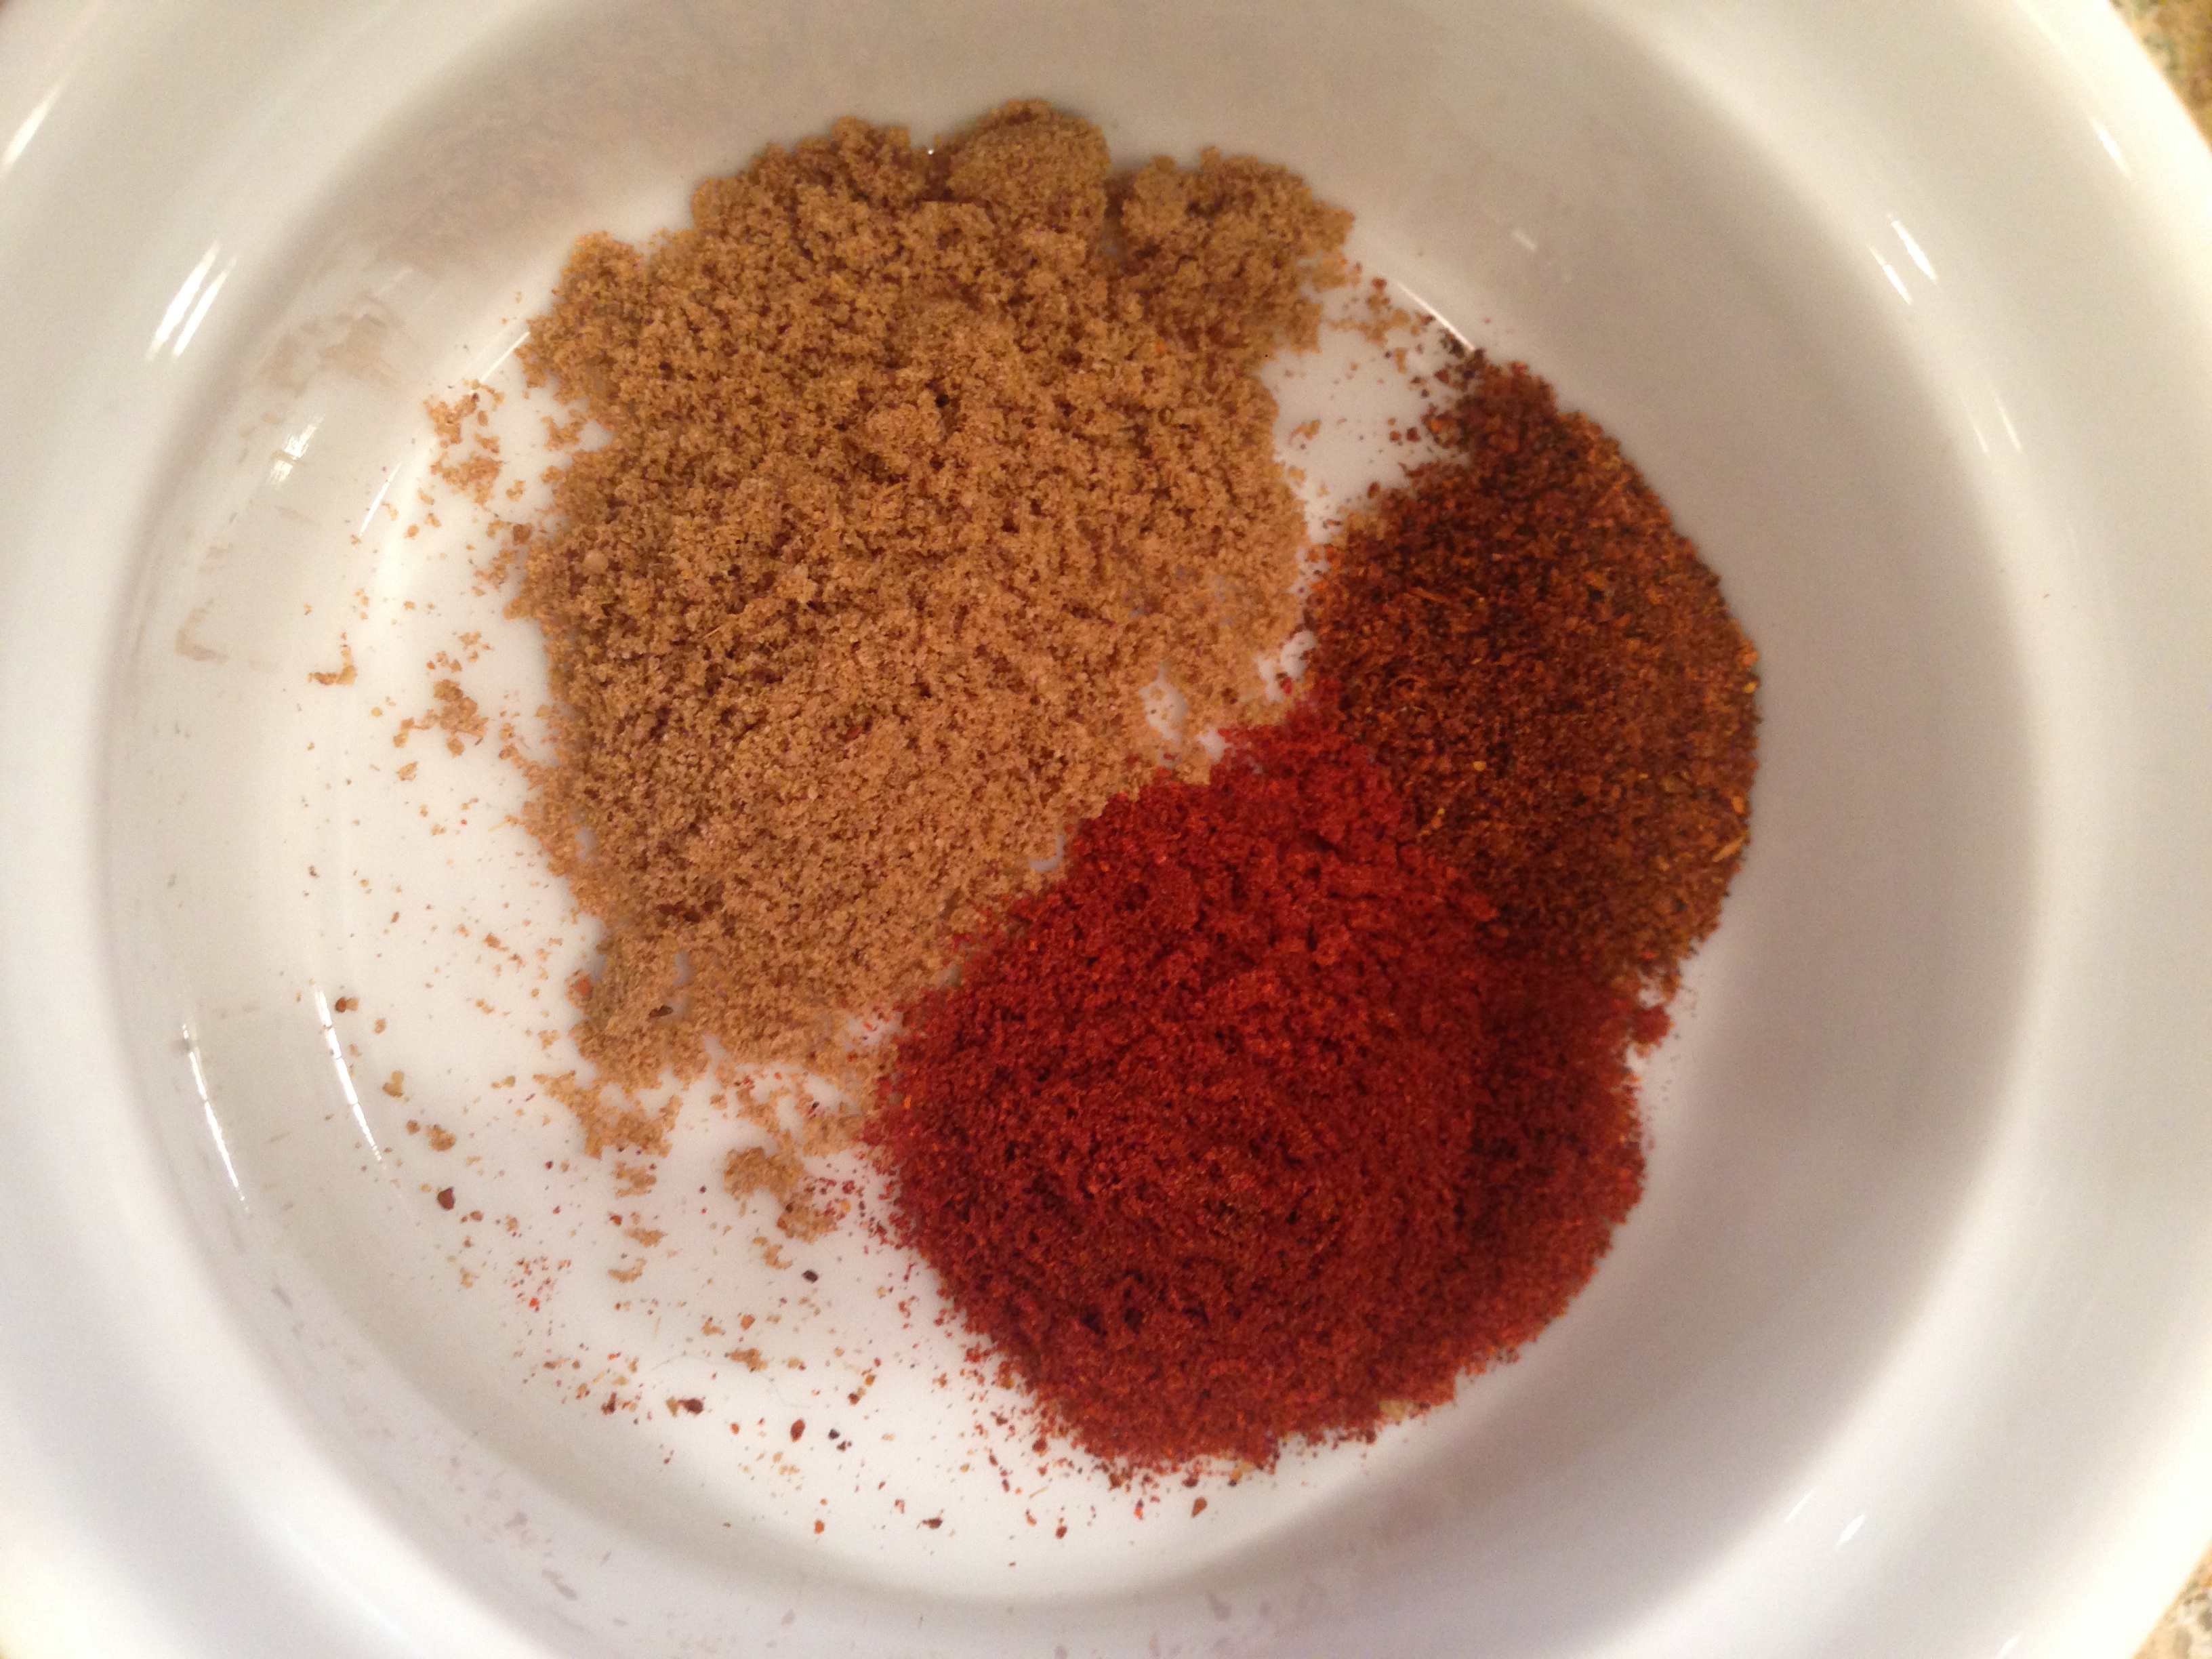
Measure the spices and combine in a small bowl to add during the next step.
Chili powder, smoked paprika, and cumin
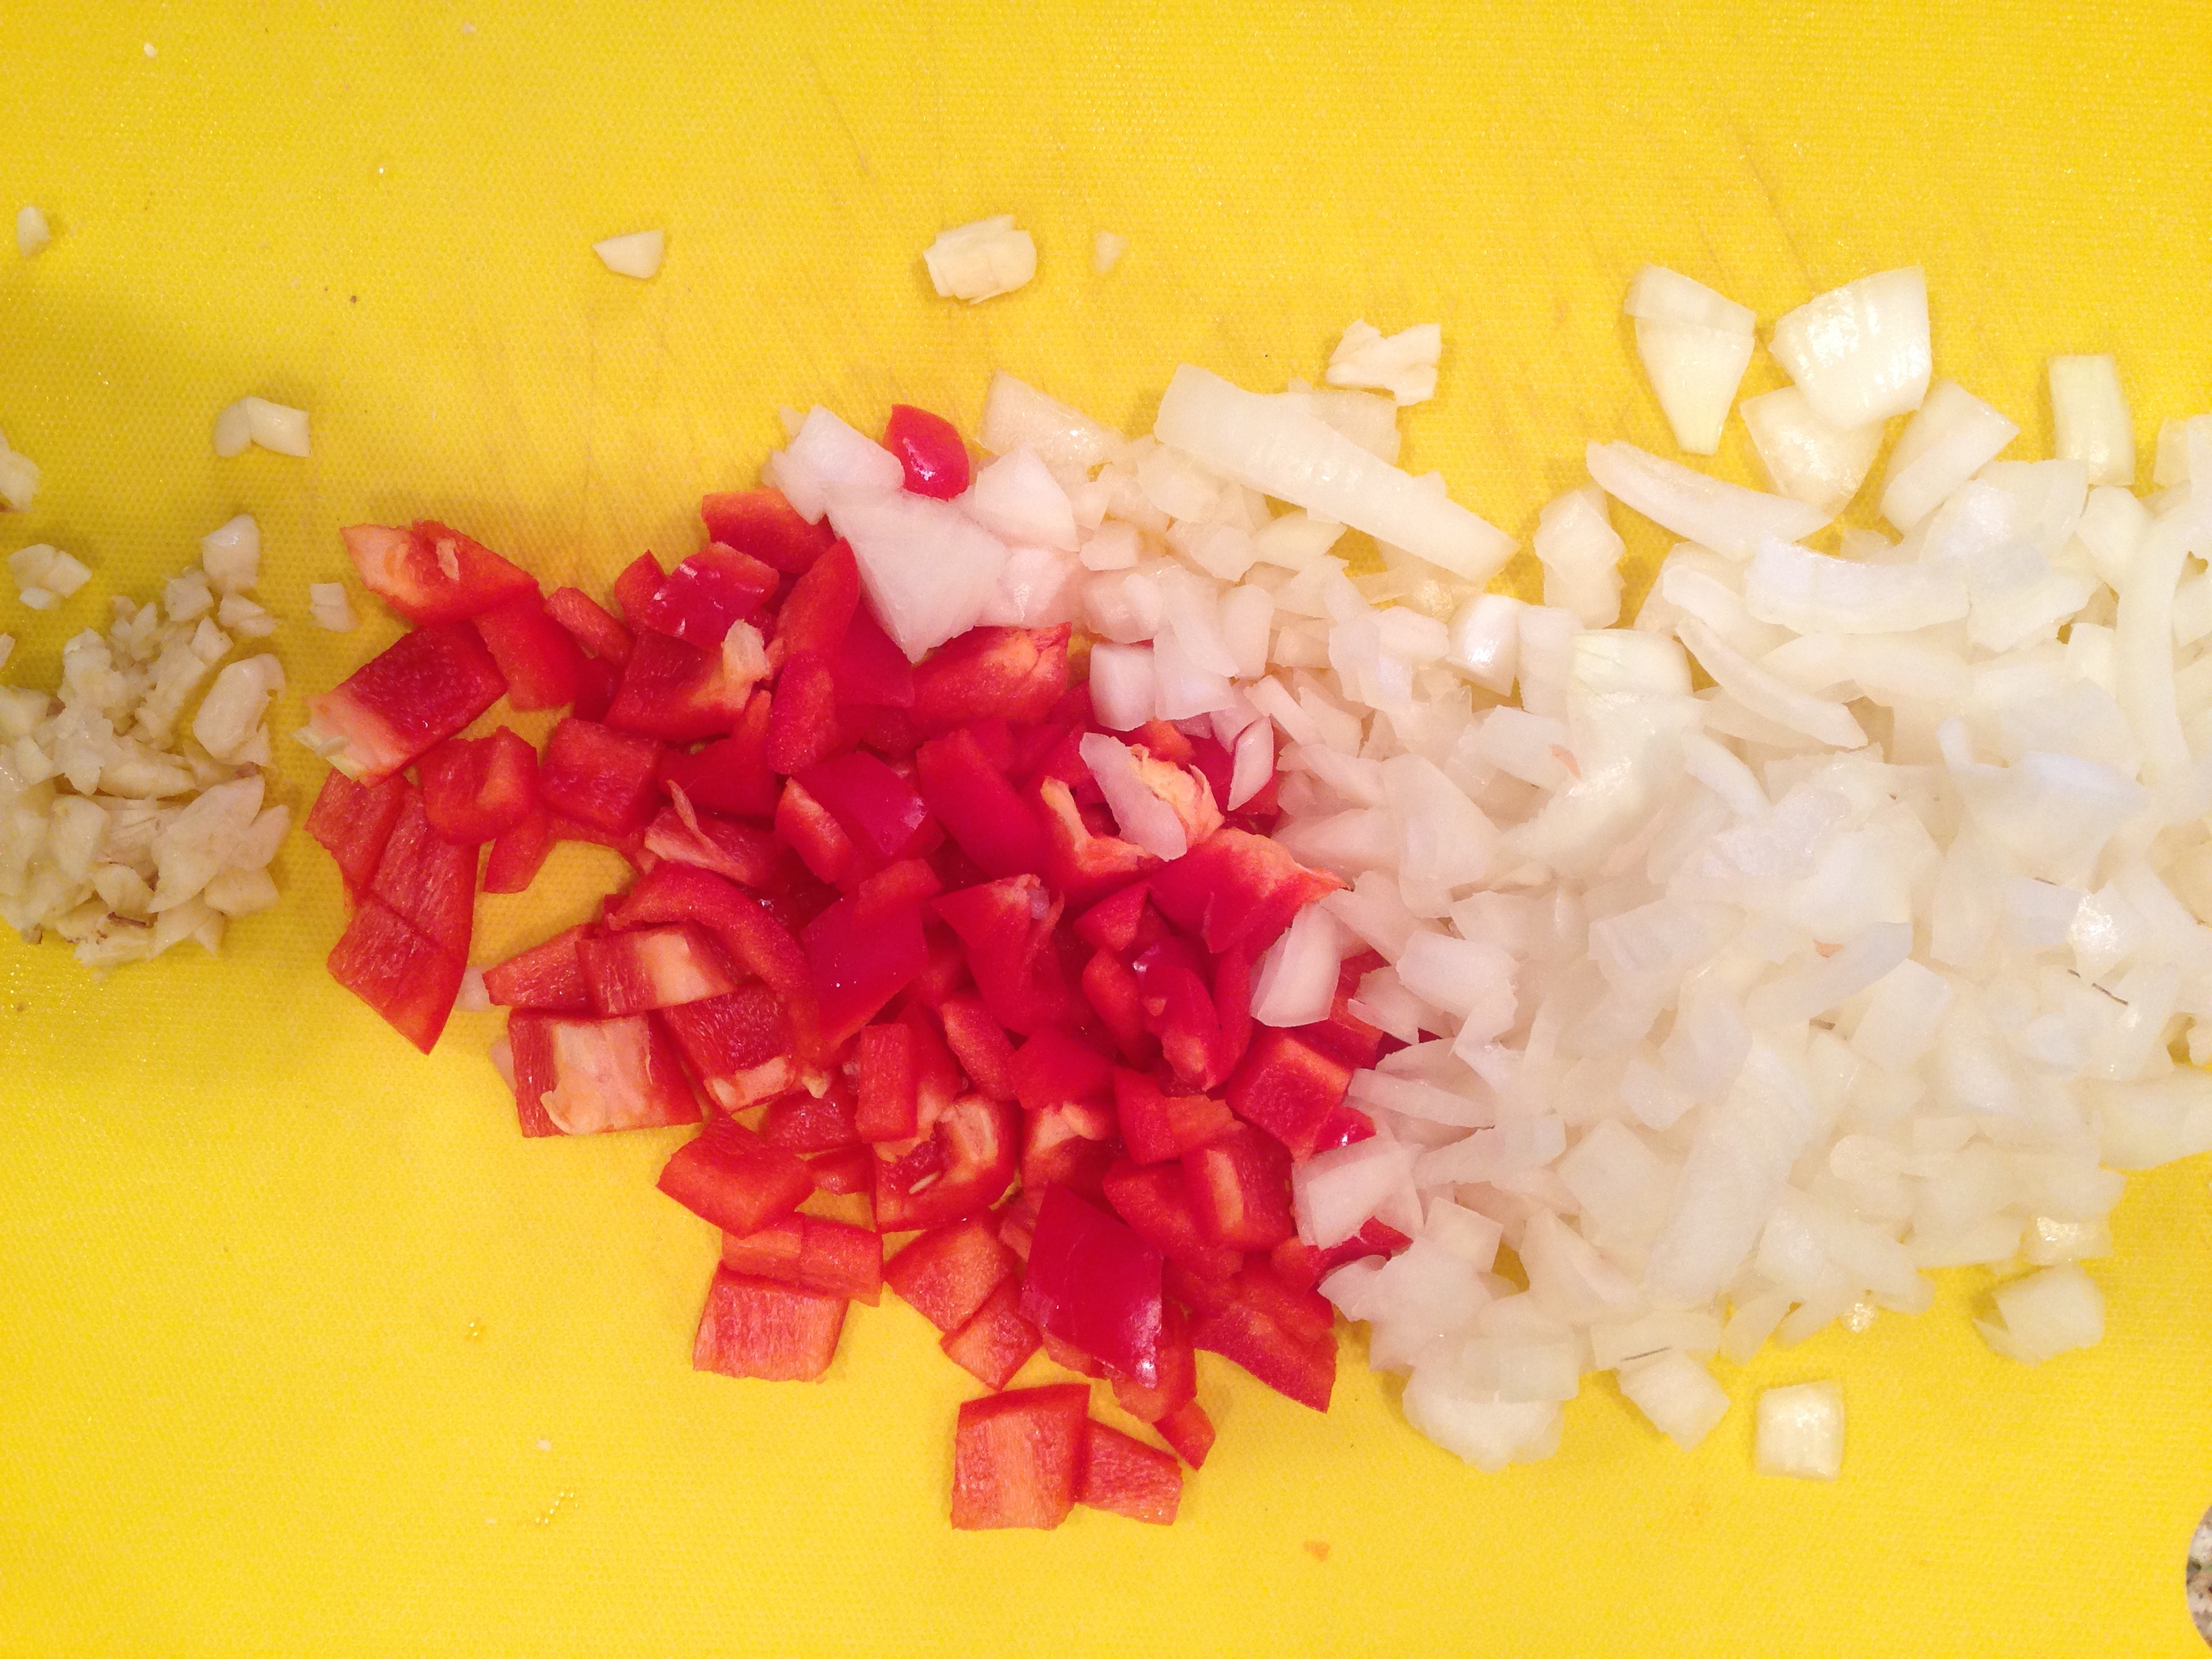
Meanwhile, heat 2 Tablespoons of olive oil in a stock pot on medium and sauté the onions, bell pepper, garlic, cumin, chili powder, paprika and a large pinch of salt. Cook, stirring occasionally, until veggies are softened, about 10 minutes.
Garlic, red bell pepper and onion waiting for to be sautéed.
Add tomatoes and another pinch of salt and turn up the heat. Bring to a boil and then reduce heat to simmer for about 30 minutes. Break up tomatoes with a spoon.
Add beans and chicken to the pot (use bouillon now if you wish). Add about 1/3 cup water or more depending on how thick you want your soup.
Simmer another 15 or 20 minutes before tasting to determine the spices or salt and pepper you want to add.
Serve with toppings
My husband said the chili was “good, but not like oh my God I absolutely love this chili!”. He thought it needed a bit more chili powder and cumin to make it a true chili flavor and tasted more like a stew than a chili. My 10 year old daughter told me she likes my ground beef chili more. That being said, I really thought it was a solid recipe that I would go back to again if I wanted a variation from my ground beef chili that I usually make.
I think I’ll start featuring a new cocktail or mixer recipe each Friday to celebrate the end of a busy week. I love trying new flavor combinations and recipes, so I will share them with you and we can have a digital cocktail party together 🙂
The Moscow Mule is hands down my favorite go-to cocktail, especially when the weather turns cold. The concoction of vodka, ginger ale (or my preference, ginger beer) and lime juice is easy to make at home. The spiciness of the ginger is hearty and warming. And I like to believe the fresh lime juice gives me the Vitamin C I need to keep my immune system strong during cold and flu season. Shhhh. Don’t say it. My favorite vodka is a local brand called Prairie Organic. I keep it in my freezer so it’s always cold.
I’d be remiss if I didn’t admit that I first learned of the Moscow Mule by watching Oprah’s camping adventure with her best friend Gayle. Apparently the Moscow Mule is a traditional camping drink, although the origins of the name are disputed. Well anyway, thanks Oprah for introducing me to my favorite cocktail!
Here’s the recipe. Traditionally the Moscow Mule is served in a copper mug but any glass will do.
INGREDIENTS:
4 oz Ginger beer (my favorite is Reed’s. It’s the real deal)
1 1/2 oz Vodka (I use Prairie Organic because it’s local and has won awards!)
Juice from 1/2 lime
METHOD:
Combine vodka and ginger beer in a copper mug or highball glass filled with ice. Add lime juice. Stir gently and garnish with a lime slice.
If you’ve been reading my blog, you know that I’m cooking my way through Gwyneth Paltrow’s latest book It’s All Good. It’s full of super healthy recipes that look amazing. I’m approaching my project as a busy mom on a budget who loves to cook. I sort of feel like Gwyneth doesn’t understand the “on a budget” part of life, so my goal is to determine how approachable her recipes truly are.
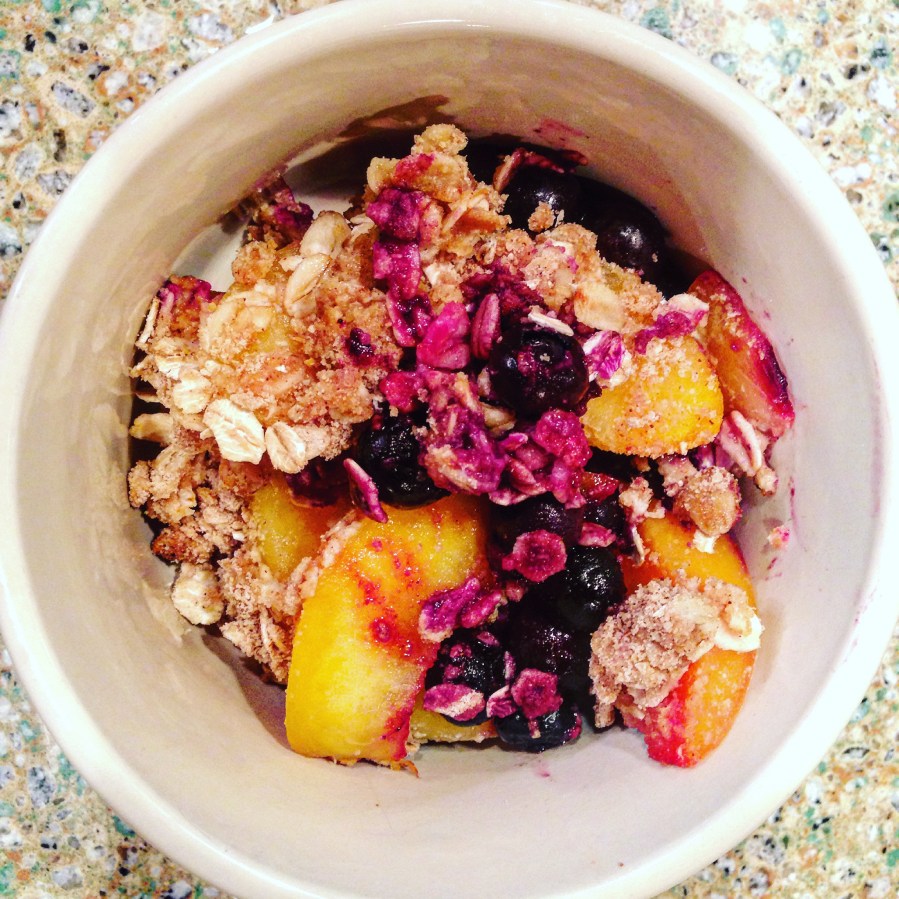
Two days ago, I had my next Gwyneth Paltrow recipe lined up to test. It’s her “Flourless Anything Crumble” which consists of 4 cups of any type of fruit, some maple syrup, olive oil, lemon juice, and cinnamon (all things that are affordable and easy to procure). It also called for almond meal and quinoa flakes for the topping rather than the standard oats and flour. I set off for the grocery store and that’s when the wheels came off of this plan. The almond meal flour was $12.00 and the quinoa flakes were $10. There was a time when I would have guiltily spent $22 on ingredients that would have languished in my cupboard long after using them *one time*. Today, however, I decided that Gwyneth Paltrow could take a seat. I decided to still make the crumble because it sounds good and I had the other ingredients. However, I amended the recipe to use oats and flour because a $22 homemade fruit crumble does not figure into my plans or budget. I can imagine the typical household in this country probably feels the same way.
I thought the resulting recipe with my changes was quite good, although much less sweet than a typical crumble. I used a mixture of frozen peaches and blueberries. I would highly recommend setting your expectations a little bit low for this and approach it as you would when you eat a piece of fresh fruit with maybe a little added *extra*. It was indeed quite healthy, tasted yummy, and I even had it the next morning for breakfast. My 10 year old ate her whole serving with gusto and my husband had two servings and then asked if I could make it sweeter next time. This isn’t necessarily a dish you would make as a dessert for a special occasion, but perhaps a healthy dessert alternative for a weeknight.
Here’s the recipe, adapted from the original featured in It’s All Good.
Fruit Crumble
Ingredients:
4 cups fruit of your choice (apples, peaches, berries, etc)
4 tablespoons real maple syrup (or more to taste)
1 tablespoon lemon juice
1/4 cup white whole wheat flour or gluten free flour of your choice
1 cup oats (old fashioned or rolled)
pinch of salt (I use sea salt)
1/2 teaspoon ground cinnamon
2 tablespoons olive oil
2 tablespoons butter (or dairy free butter like Earth Balance), cut up into small pieces
METHOD:
Preheat oven to 400 degrees. Toss the fruit with 2 tablespoons (or more to taste) of the maple syrup and lemon juice. Spread out into an 8×8 baking dish. Mix the flour, salt, cinnamon and oats in a large bowl. Stir in remaining maple syrup and the 2 Tablespoons of olive oil. Spread the topping on top of the fruit. Scatter the butter pieces on the top. Bake until the topping is golden brown and the fruit is bubbling, about 30 minutes. Serve with homemade whipped cream or ice cream for an extra treat. Or, heat up leftovers in the morning and eat for breakfast with yogurt.
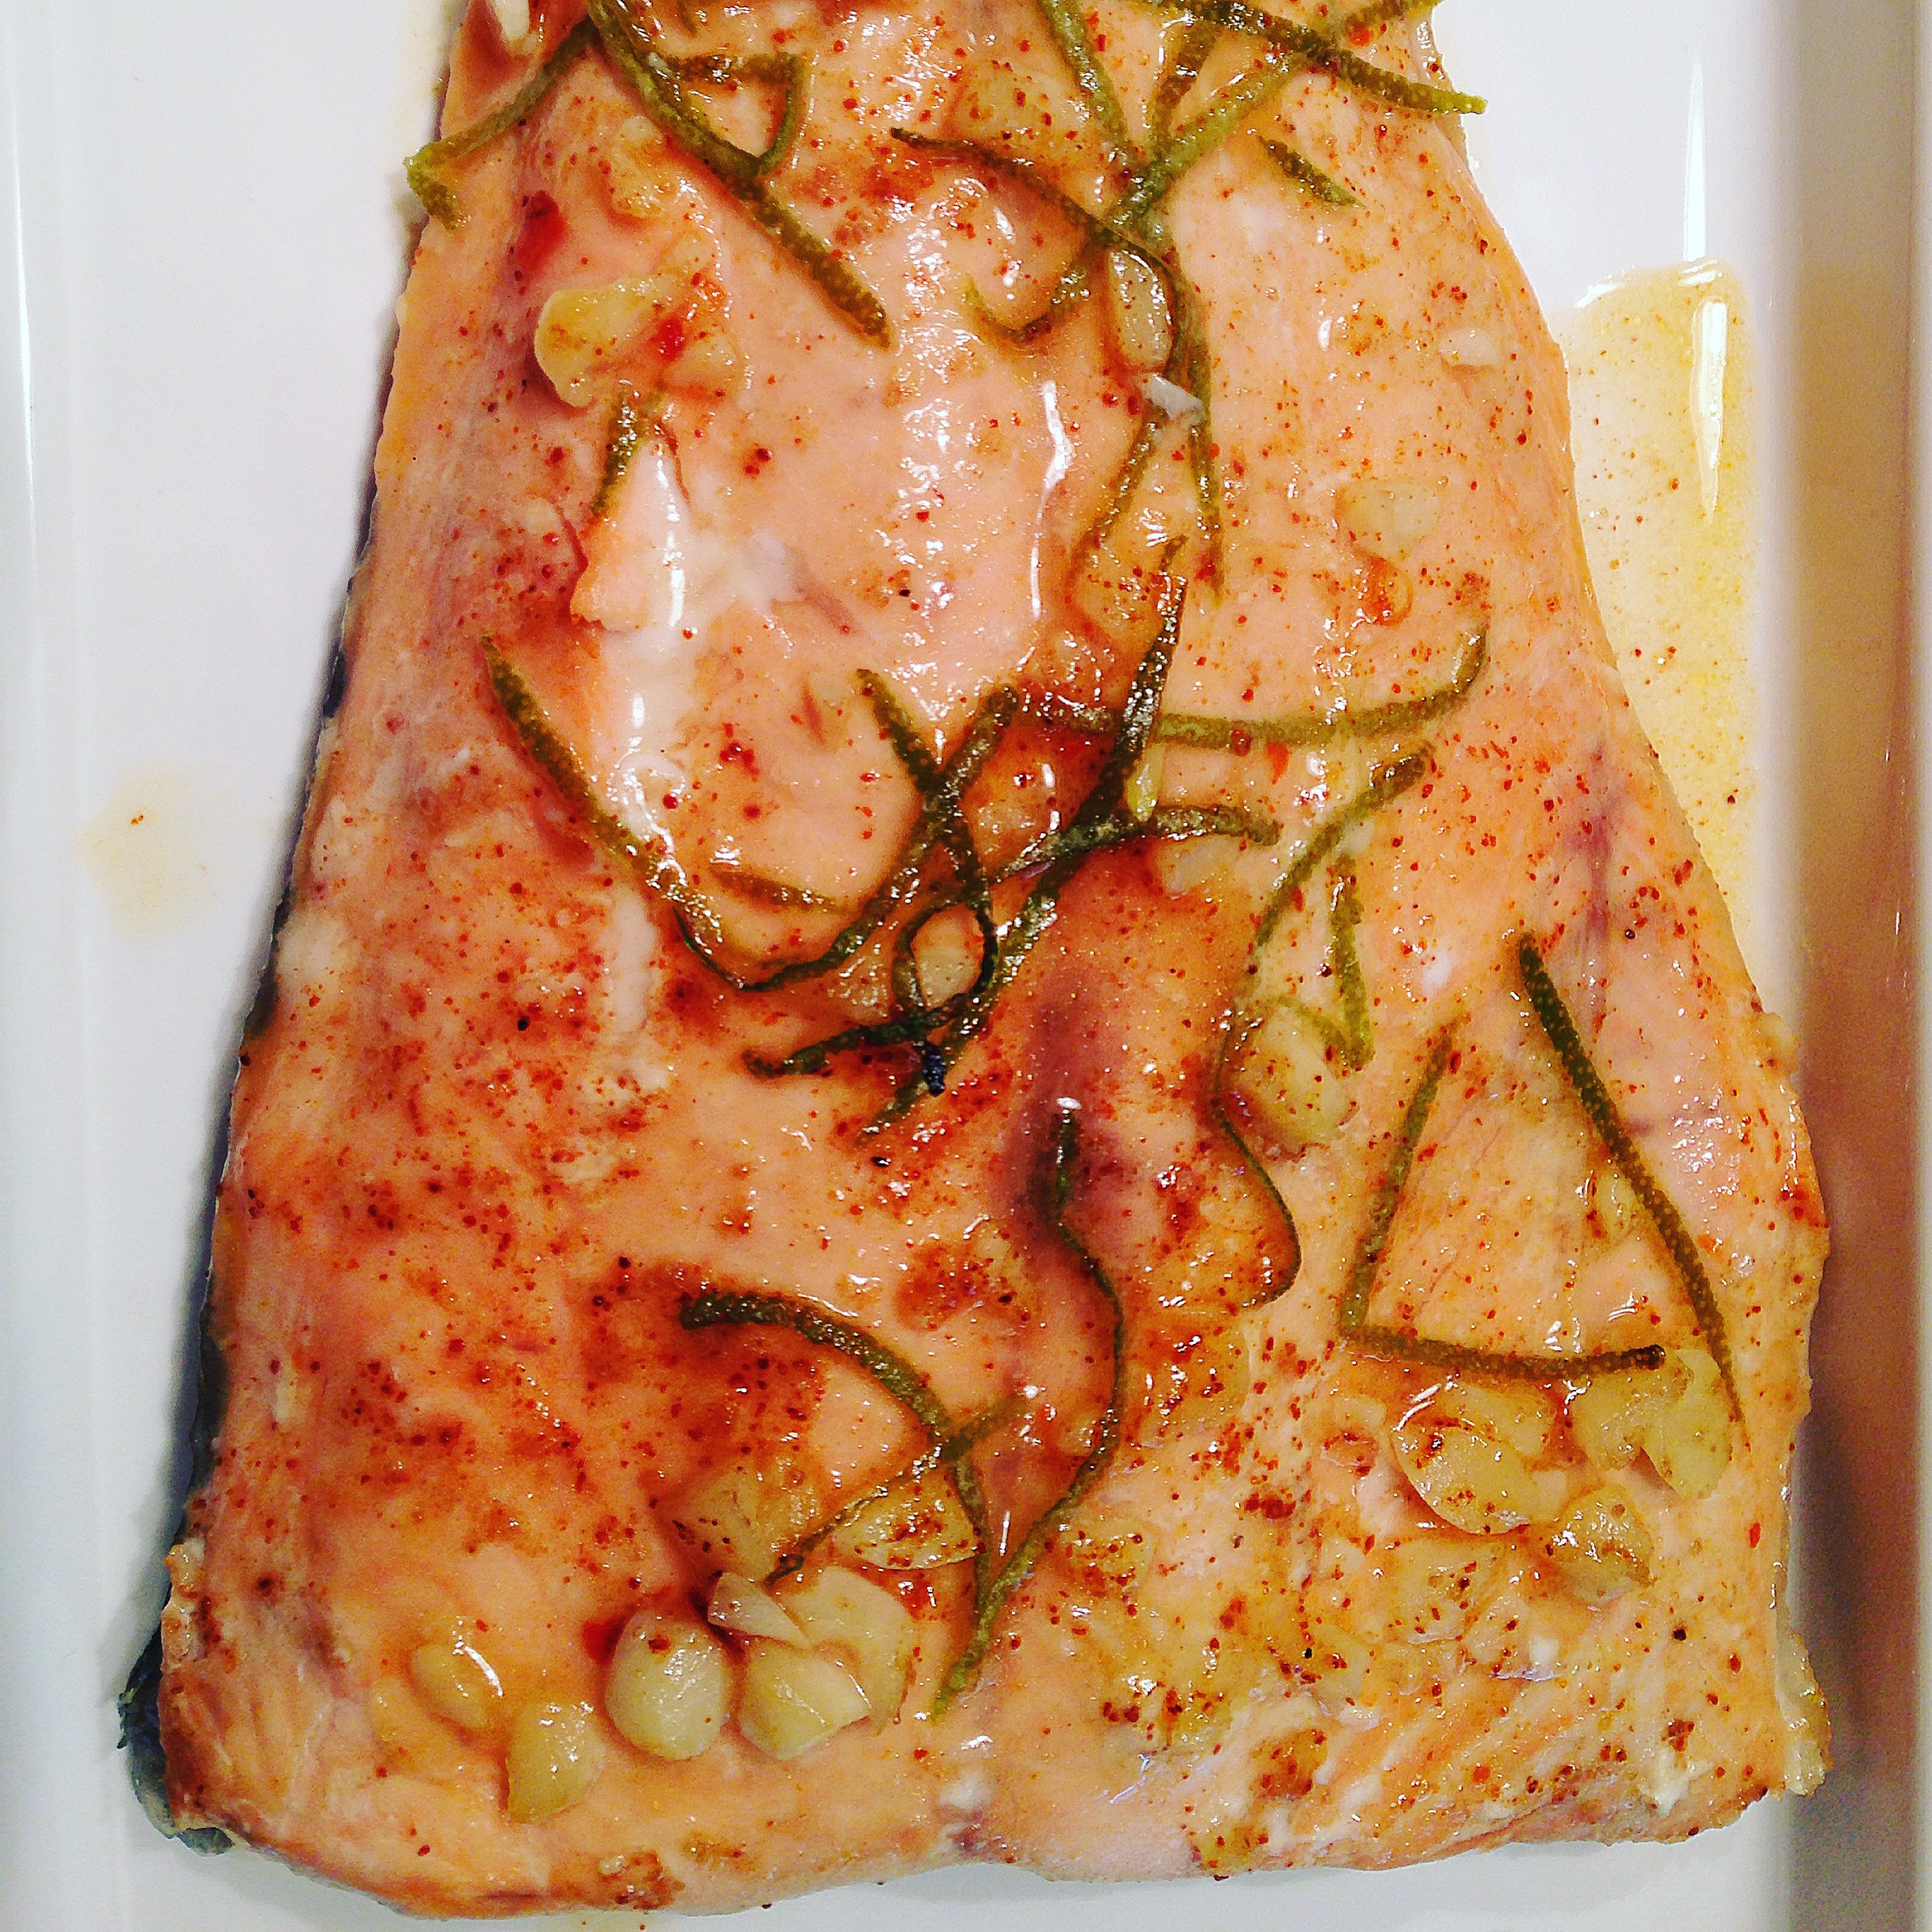
We all know how good salmon is for us, especially when it’s wild caught off of the coast of Alaska. It’s full of essential Omega 3 fatty acids (the good kind of fat that keeps your brain and heart working well). It’s high in protein, too. I make salmon at least once a week and I love trying new recipes to keep it fresh and interesting.
I decided to try this recipe posted by my friend Pronto Pup. He is a much funnier (and profane) blogger than I ever hope to be but he’s also a great cook. It’s fun to read his cooking blog for new ideas. He’s got kids around the same age as my daughter, so I get good insights into what recipes might be “child friendly”. My daughter is a pretty adventurous eater but anything spicy still can be hard for her to eat. He observed that this salmon recipe was a bit too spicy for his kiddos so I toned down the crushed red pepper in my version and my daughter really enjoyed it. I think she prefers my lemon pepper garlic version but she still ate a good amount of this.
The original version is posted here (thanks Little Spice Jar!).
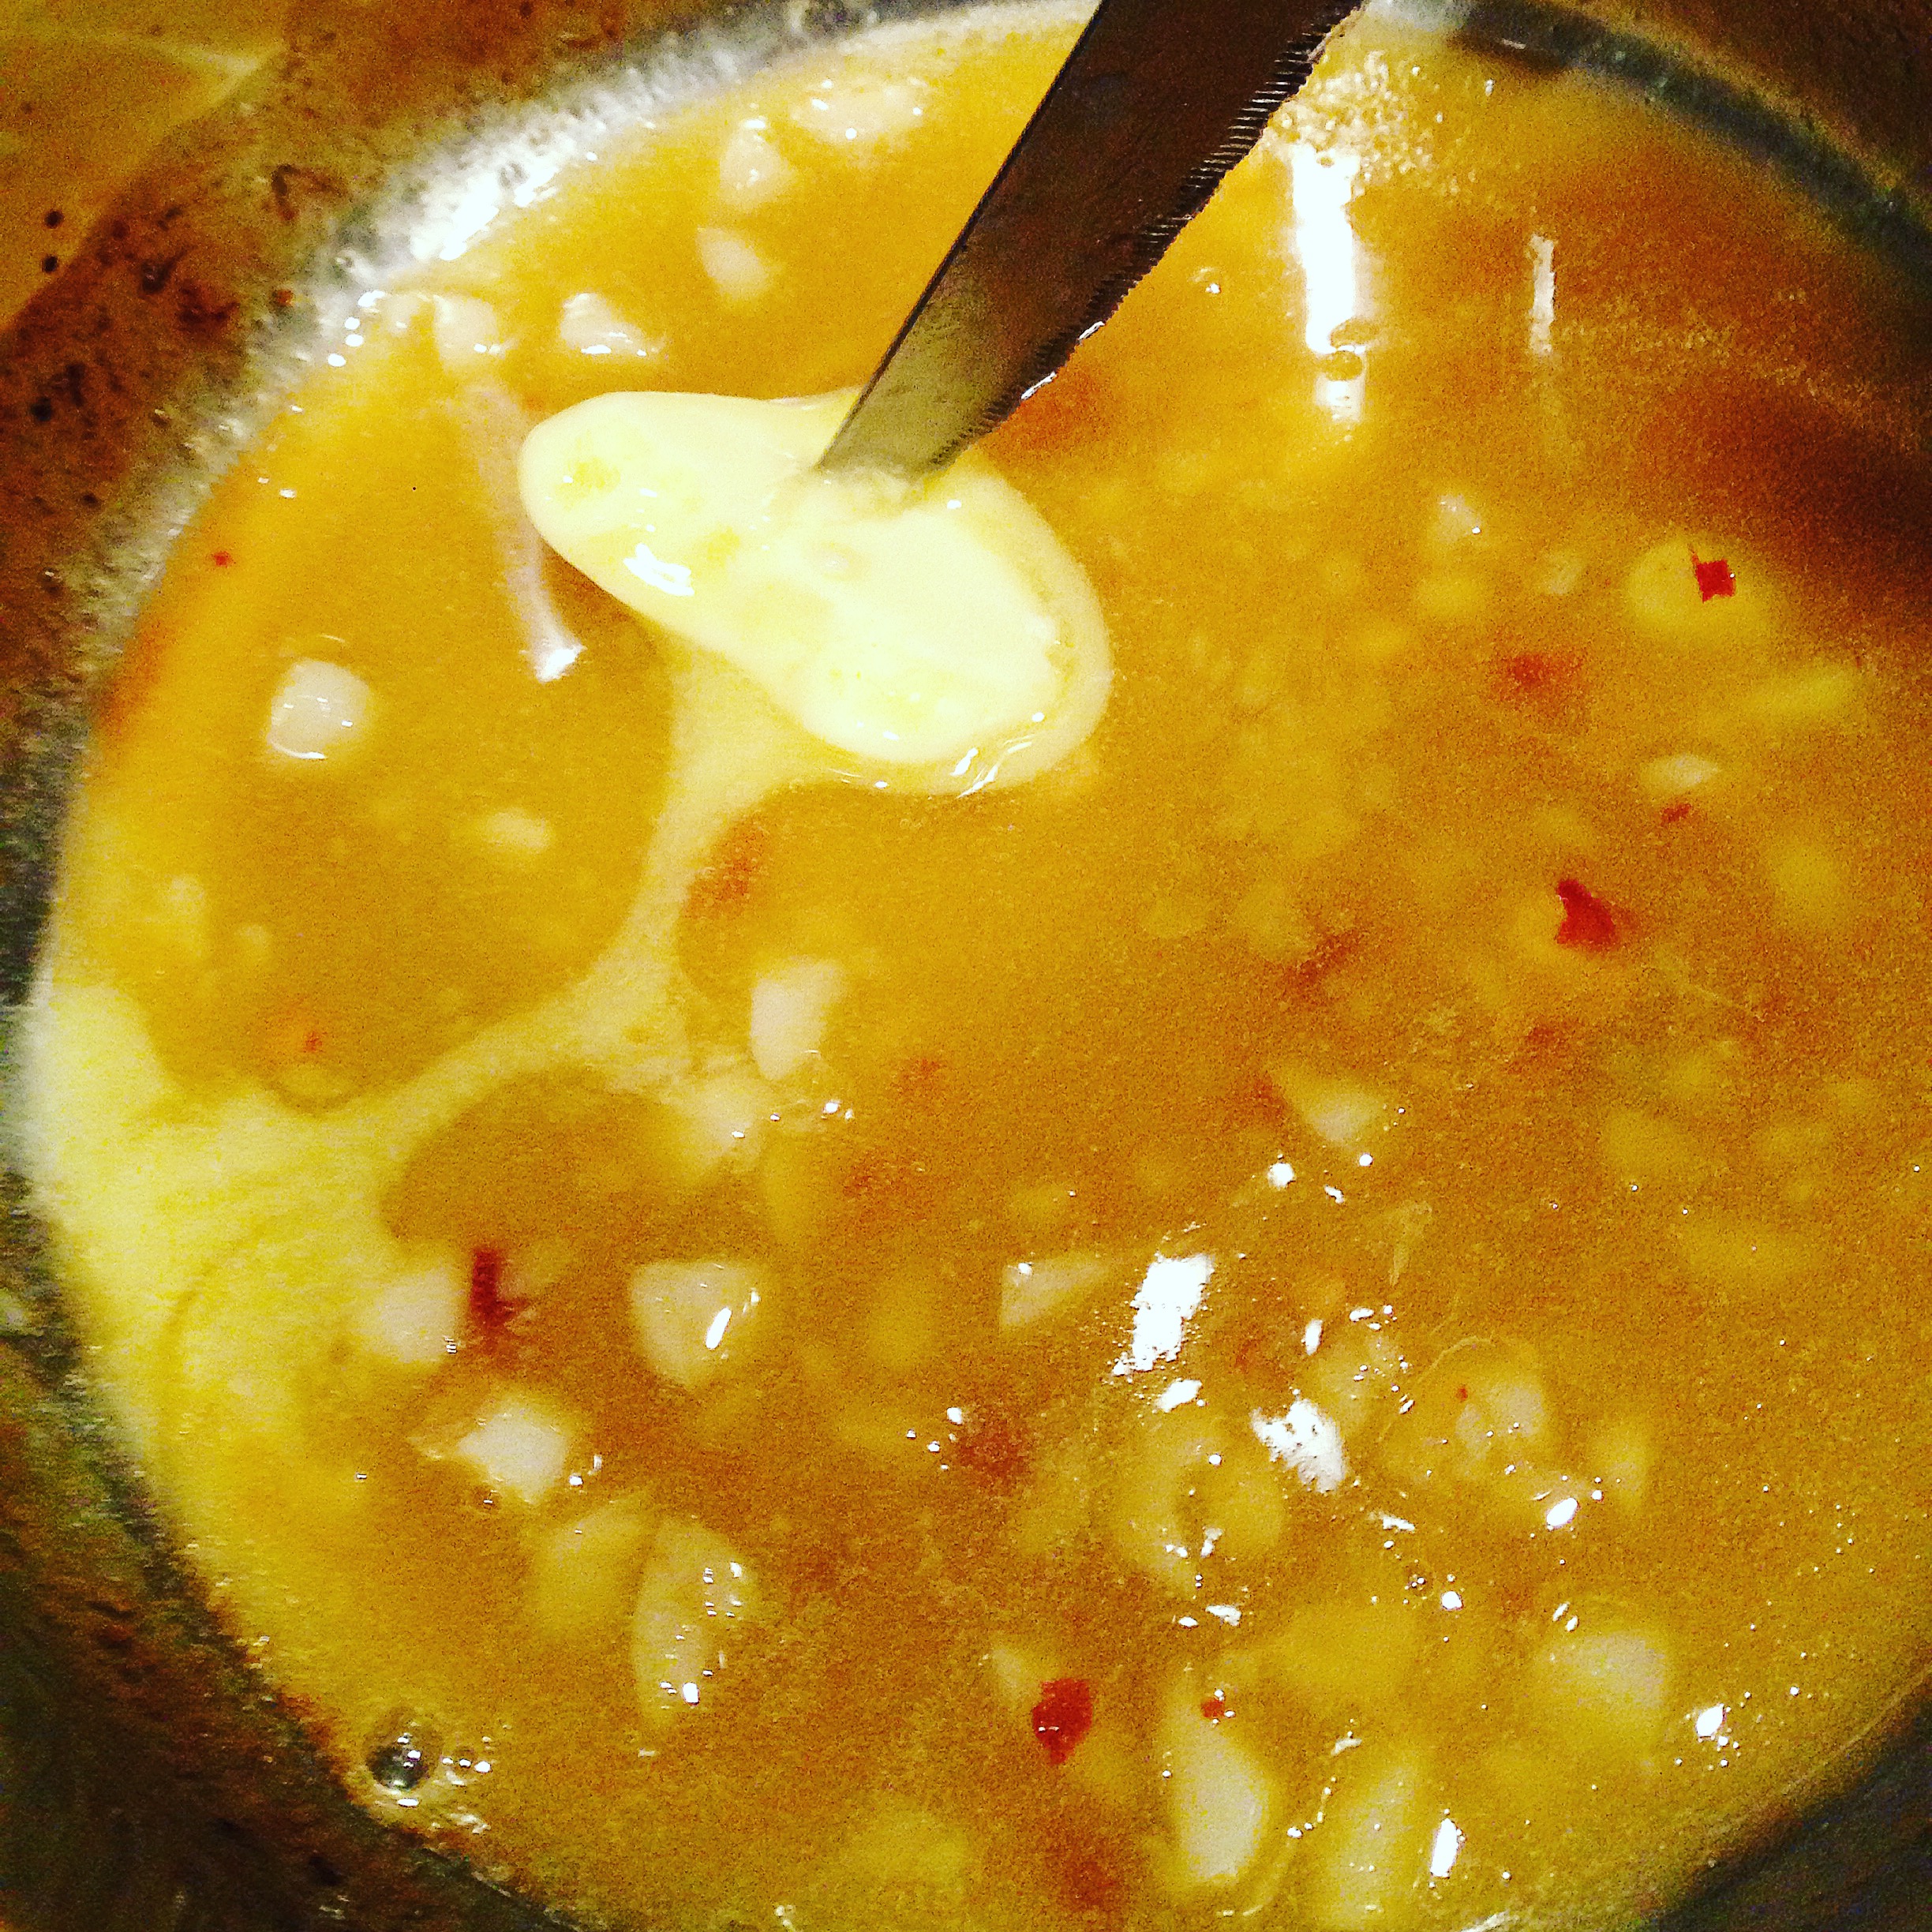
I did one thing slightly different than directed, which was to brush about half of the chipotle sauce onto the salmon before cooking and then reduce the sauce even further on the stovetop to use as a glaze after the salmon was finished. The glaze was too strong for my daughter but my husband and I really liked it. It had a full lime/honey/chipotle flavor and added some extra moisture to the fillet.
Here’s the sauce as I’m incorporating the butter. It’s really rich and yummy.
The preparation for the salmon is so easy, and cooking it was pretty foolproof.
The salmon prepared with chipotle butter sauce and lime zest. Just wrap it up in the foil and bake in the oven. I love that I didn’t have to clean a roasting dish afterwards.
I usually make a roasted veggie on the side but since I was making dessert (check back for the recipe and review on that!) I felt pressed for time and did corn on the cob and frozen green beans instead.
I will absolutely make this dish again and can’t wait to try tweaking the flavors a bit next time just for the fun of it.